AB Launcher User Manual
This manual walks new AB Launcher users through setup step by step, from the basic screen layout to presets, split screens, the app drawer, audio, automation, and licenses.
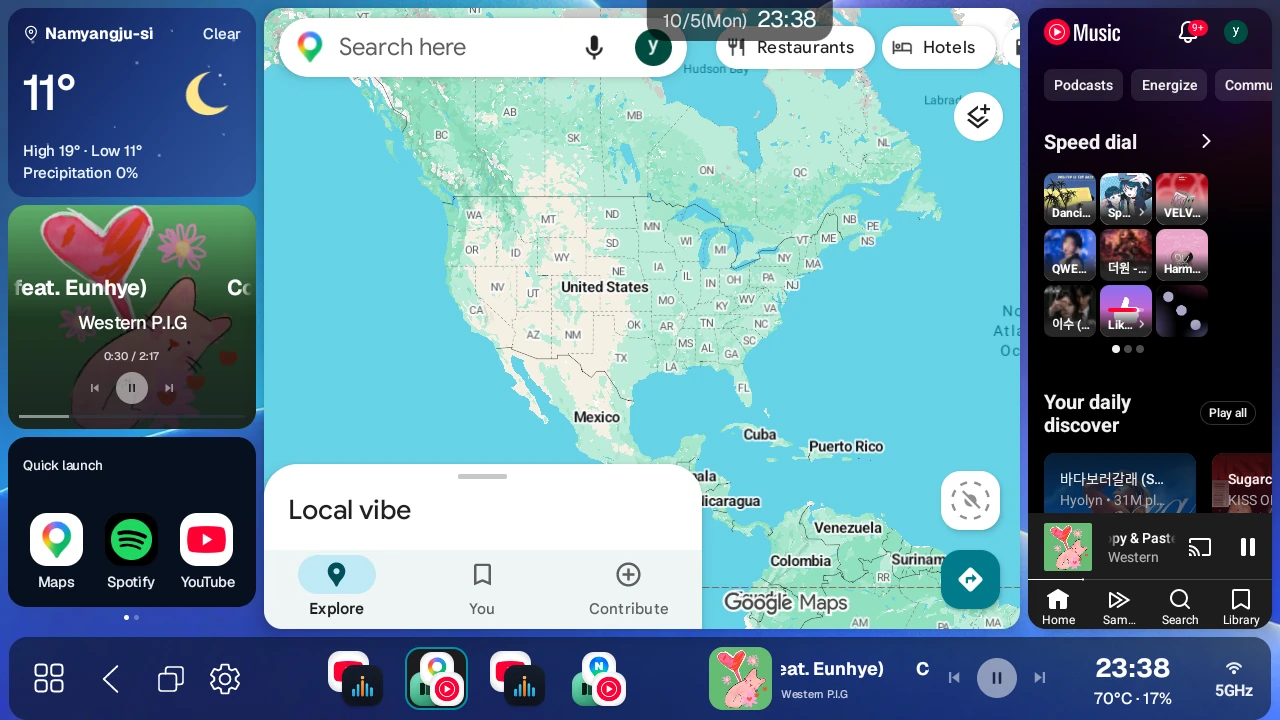
1. What to do after the first launch#
AB Launcher is a launcher for Android devices in cars, such as Android AI Boxes that connect to the car display over USB and all-in-one head units. It places several apps on one screen and saves the combinations you use often as presets so you can bring them back quickly. Its install size is small, so it puts little load on the device.
Compatible devices and installation files#
Find your device below and choose the appropriate installation file. Even the same product can behave differently with different firmware. Before buying a license, use the Beta trial to check split screen, touch, and app launching on your device.
Recently used devices — Korean brands and Carlinkit#
As of November 2026, these devices have been in use within the last three months. Install the standard version on the AI Boxes below.
| Brand or product family | Models |
|---|---|
| iNavi | ICP-100 |
| Mando | SMARTAUTO MCP-100 |
| Carlinkit | Pro · Pro 2 · Pro 3 |
| Carlinkit · AutoKit | TBox Plus |
| Carlinkit · AutoKit | TBox Ultra · Ultra 2 · Ultra 3 · Ultra 4 |
| TBox · AutoKit | TBox Ambient · AutoKit Ambient |
| TBox | TBox UHD · TBox S · TBox 660 · TBox 668 Plus |
| Mgears | Mstick4 — rooting required |
Recently used devices — other AI Boxes#
These devices also use the standard version. If a specific model is not listed, check the product name you purchased as well.
| Brand or product family | Models |
|---|---|
| Ottocast | OttoAibox P3 Pro · OttoAibox Nano · OttoAibox |
| ApplePie | ApplePie · ApplePie UFO |
| AutoLinkr | AutoLinkr Pro · AutoLinkr Elite |
| AUTOUX | AUTOUX · AUTOUX MAX |
| BRUXE | BRUXE R6 · BRUXE AIBOX |
| INCARLINK | INCARLINK Max |
| Other AI Boxes | MMB · JoyeBox · AX-AB7 · HI-BOX · KSPIV |
| Other AI Boxes | PLAYAIBOX · Rocket · KPLER · Casper 4958 · CB6 |
| Other AI Boxes | OW-AiBox · Smart Ai Box · Hongqi (红旗) |
| Firmware check needed | Car Smart · iHeylinkit — see the device-specific notes below |
Recently used devices — all-in-one head units#
| Model or product family | Installation file |
|---|---|
| FYT 7862 · 7862S | Standard version |
| FYT 7870 | FYT version (_7870) |
| FYT 7865 | FYT version (_7870) |
| UIS8581A family | Standard version |
MediaTek FF_866X · 825X_Pro | Standard version |
| TEYES CC3 | Standard version |
GT7H-CAR · GT7Pro-CAR | Standard version |
Finding an AI Box by its model name#
If your product name differs from the list, check the model name in About device in Android settings. Products using the model names below may be sold under different names by different sellers.
| Product family | Model name shown in About device |
|---|---|
| Qualcomm-based AI Boxes | Bengal for arm64, DSB-0230, Lito for arm64 |
| Qualcomm-based AI Boxes | Lahaina for arm64, parrot for arm64, QCM6125 |
| Qualcomm-based AI Boxes | SC138-EAU, sdm660 for arm64, ss80x_64 |
| Qualcomm-based AI Boxes | trinket for arm64, msm8953 for arm64 |
Devices with the same model name may still behave differently depending on the manufacturer and firmware. In particular, the name QCM6125 alone does not mean AUTOUX, HI-BOX, KSPIV, and Joying are the same product.
Finding an all-in-one head unit by its model name#
| Product family | Model name shown in About device |
|---|---|
| FYT 7862 · 7862S | ums512_1h10_Natv |
| FYT 7870 | uis7870sc_2h10_nosec, uis7870sc_2h10 |
| FYT 7865 | uis7865_6h10_Natv |
| UIS8581A | UIS8581A, uis8581a2h10, uis8581a2h10_Automotive |
| MediaTek family | ac8257_demo, 5960, 8227L_demo, MT6768 |
| MediaTek family | YT5750B, YT7212B, YT7216, YT7216C, YT9216CJ |
| Other all-in-one units | UJC201_64, Essgoop3_bsp, DFSK-E3-G, GEELY IHU629G, G5 |
For FYT 7870 and 7865, follow the dedicated-version installation instructions below. Choose the standard version for other devices.
Devices that need further checking#
These devices are listed separately from the recently used devices above. Start with the Beta trial to check your own device. If the product name appears only as one of the codes below, ask the seller or a support channel to confirm the exact device.
| Device or displayed name | What to check |
|---|---|
DUDUAUTO · SAIC · YT5760B | Check app launching and screen controls with the current firmware |
AiBox · AI-Box · car6125_eau138 | Confirm the exact product name before installing |
Aibox · AIBOX · AUTO · AutoBox · Android | Confirm the exact product name before installing |
QUAD-CORE A133 b6 | Install the standard version, then check screen controls |
m600 for arm64 · msm8953_32 · PX30 | Confirm the exact product name and firmware |
k62v1_64_bsp · k80_bsp | Confirm the exact product name and firmware |
tb8163p3_bsp · tb8768p1_64_bsp | Confirm the exact product name and firmware |
s9863a1h10_Natv · K706 (ROCO) | Check split screen and touch after installing |
Device-specific notes#
- Mstick4: Rooting is required. Install on a rooted device, then check split screen and touch.
- UIS8581A: Split screen or touch may not work with some firmware. Check both first after installing.
- Car Smart · iHeylinkit: On 4490-series devices with the
parrot for arm64model name, compatible firmware is needed if apps open outside the split panels. - Joying: Installation or split screen may be restricted depending on the product and firmware. Check before buying a license.
- Mstick3 · CAST: These are not currently listed as supported devices.
Choosing the installation file for your device#
Open Download app on the official website in the browser of the Android device connected to your car.
- Standard devices: Install the standard AB Launcher.
- FYT 7870 · 7865: Expand Using an FYT 7870 or 7865 head unit?, select AB Launcher (FYT 7870/7865 only), tick the dedicated-version confirmation box, then download. Confirmed FYT 7865 firmware uses this same dedicated version.
- For automation on these FYT devices, select Automation helper (FYT 7870/7865 only).
Initial setup order#
We recommend setting things up in this order.
- Choose the Sidebar position.
- If the sidebar is at the bottom, set the Driver seat position.
- Open the apps you use most and build a split screen.
- Save the current screen as a preset.
- Hide apps you don't need in the app drawer.
- Adjust the screen size, DPI, clock, theme, and audio settings for your car.
- If you have a Pro license or the Beta trial, set up user automation.
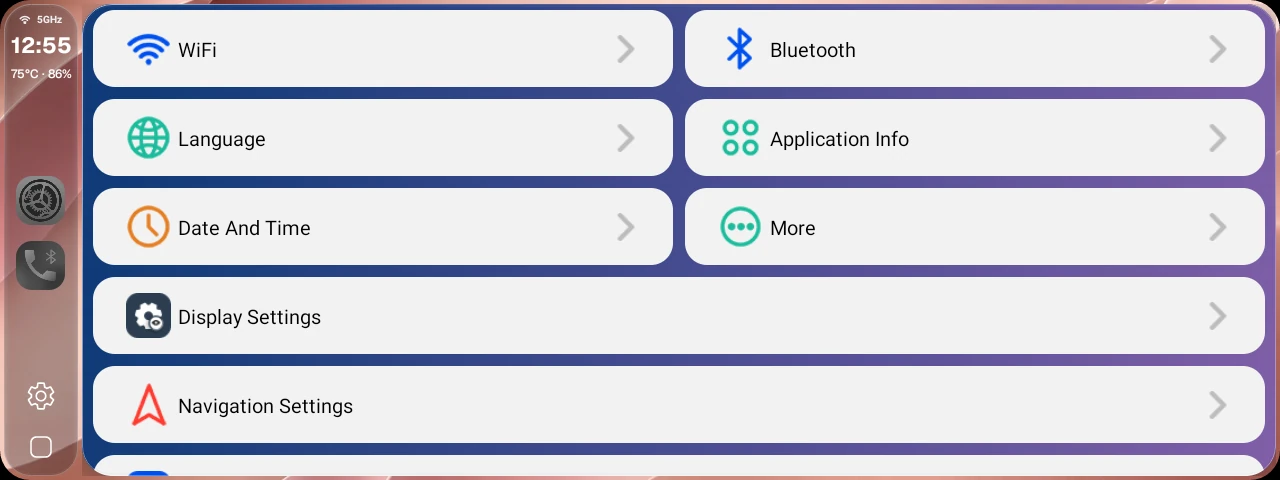
To open Settings, press the app drawer button on the sidebar to open the app drawer, then press the gear button that appears next to the app drawer button.
2. Understanding the main screen#
The AB Launcher main screen has three parts.
| Area | Role |
|---|---|
| Sidebar | The control area with presets, the app drawer button, the action button, and the recent apps button. The Settings (gear) button appears when you open the app drawer. Turn on Settings button in Settings → Sidebar to show it on the sidebar at all times. |
| App area | The single, 2-way, or 3-way split screen where apps are shown |
| Top clock | Shows the time. With a Pro license or the Beta trial and the automation helper app installed, press the clock to open the manual automation run window. The window opens even when a panel has no app or only a widget, so you can turn Wi-Fi and the hotspot on or off. If these conditions aren't met, pressing the clock does nothing. |
You can place the sidebar on the left, on the right, or at the bottom. Put it where it's easiest to reach, based on the shape of your car monitor and the driver seat position.
3. Driver seat position and sidebar settings#
Setting the driver seat position#
- Press the app drawer button on the sidebar to open the app drawer, then press the gear button that appears next to the app drawer button to open Settings. If you turn on Settings button in Settings → Sidebar, the gear button stays on the sidebar and you don't need to open the app drawer.
- In Settings → System → Driver seat position, choose Left or Right. The default is Left.
- This setting changes the layout only when the sidebar is at the Bottom. The app drawer button, the action button, and the recent apps and Settings buttons (if turned on) move to the driver's end, and the clock, signal status, and media player move to the opposite end. The close, hidden apps, and ⋮ buttons at the top of the app drawer also move toward the driver, and the search box moves to the opposite side. When the sidebar is on the left or right, the layout doesn't change.
Setting the sidebar position#
- Go to Sidebar position in Settings → Sidebar.
- Choose Left, Right, or Bottom.
- On wide landscape screens, a left or right sidebar is usually easier to use. On portrait or short screens, a bottom sidebar may be easier.
Sidebar size#
Adjust only the sidebar with Sidebar size in Settings → Sidebar. It scales relative to the launcher UI size from 60 to 120% in 5% steps. The default, 100%, follows the launcher UI size. Default returns the slider to 100%, and you still need to press Apply to use it.
Choose a size with the slider or −/+ buttons, press Apply, then confirm to reload the launcher screen. Panel apps may also reload, so make this change when a brief interruption to navigation or music is acceptable.
Sidebar collapse settings#
You can keep the sidebar open at all times, or start with it collapsed to get more screen space. Two of these settings have similar names, so keep them apart. Sidebar reopen style, Sidebar expand style, Button size, and Auto-collapse delay can be changed only when Launcher sidebar collapsed is on. It's off at first, so these items are dimmed and can't be changed.
① Collapsing the sidebar and reopening it
- Launcher sidebar collapsed: When on, the sidebar collapses when you close Settings and starts collapsed when the launcher restarts. When off, the sidebar always stays open.
- Sidebar reopen style: Choose how to open the collapsed sidebar.
- Button: Press the small button or push it inward to open the sidebar. Press and hold the button, then drag it to move it along the screen edge. The new position is kept for next time.
- Swipe bar: Push the bar at the screen edge to open the sidebar.
- Button size: When you use the button style, choose Small, Medium, or Large.
- Auto-collapse delay: Choose how long a temporarily opened sidebar waits before collapsing again, from 1 to 5 seconds in 0.5-second steps (default 3 seconds).
With Launcher sidebar collapsed on, you can also collapse the sidebar right away without waiting. Swipe over the preset list on the open sidebar toward the screen edge (left for a left sidebar, right for a right sidebar, down for a bottom sidebar). With Push panels as the expand style, swipe at least halfway to collapse it; if you let go sooner, it opens again. With Cover panels, or while the app drawer or Settings is open, a short swipe collapses it right away.
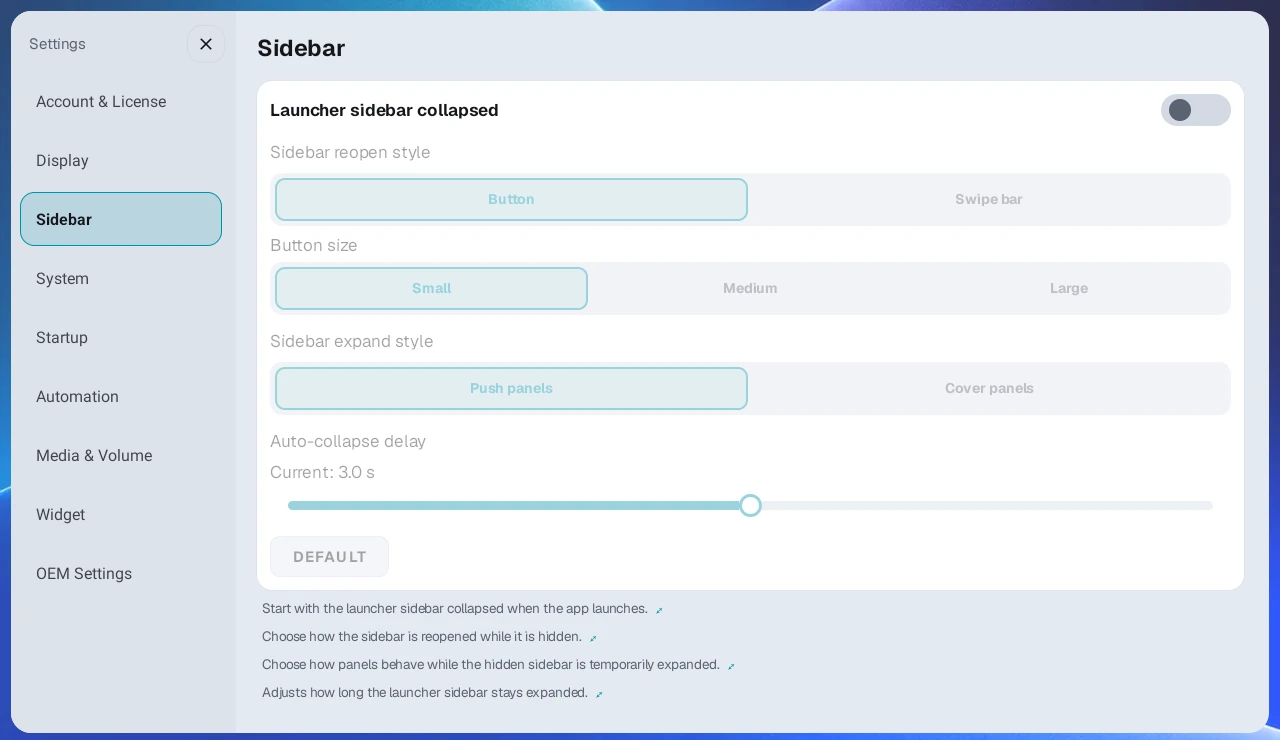
② How the split screen moves when the sidebar opens (a separate setting)
Sidebar expand style is a different setting from Sidebar reopen style above. It controls how the split screen moves when you open the sidebar.
- Push panels (default): The sidebar slides in and smoothly pushes the split screen aside.
- Cover panels: The split screen stays in place and the sidebar appears on top of it. If the sidebar looks empty on your device, try this option.
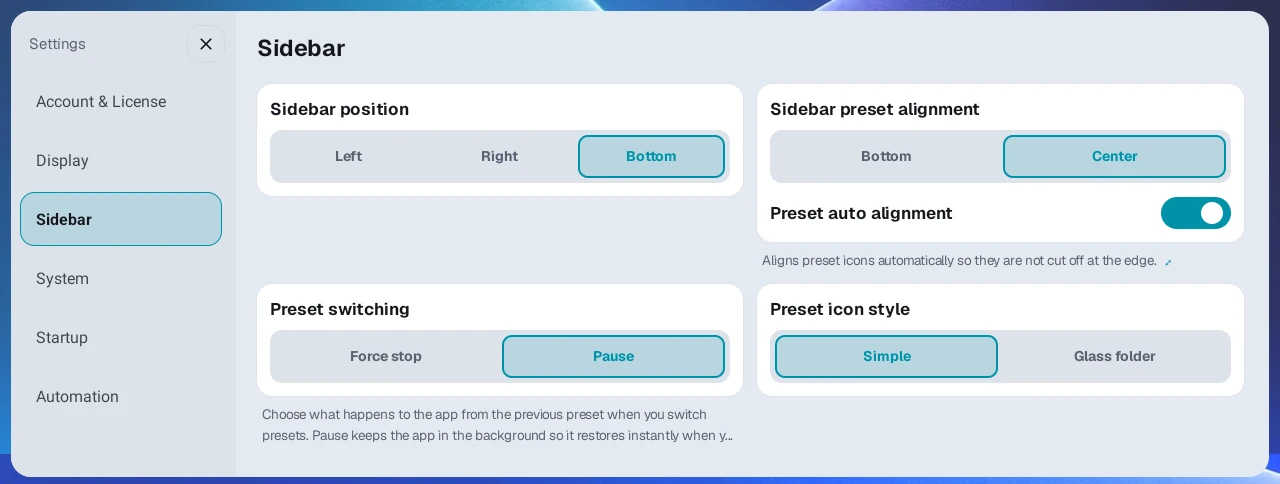
Sidebar preset alignment#
With a left or right sidebar, choose whether preset icons gather at the Bottom or in the Center. This doesn't apply to a bottom sidebar.
On this screen you can also set Sidebar position, Preset switching (Pause/Force stop), and Preset icon style (Simple/Glass folder).
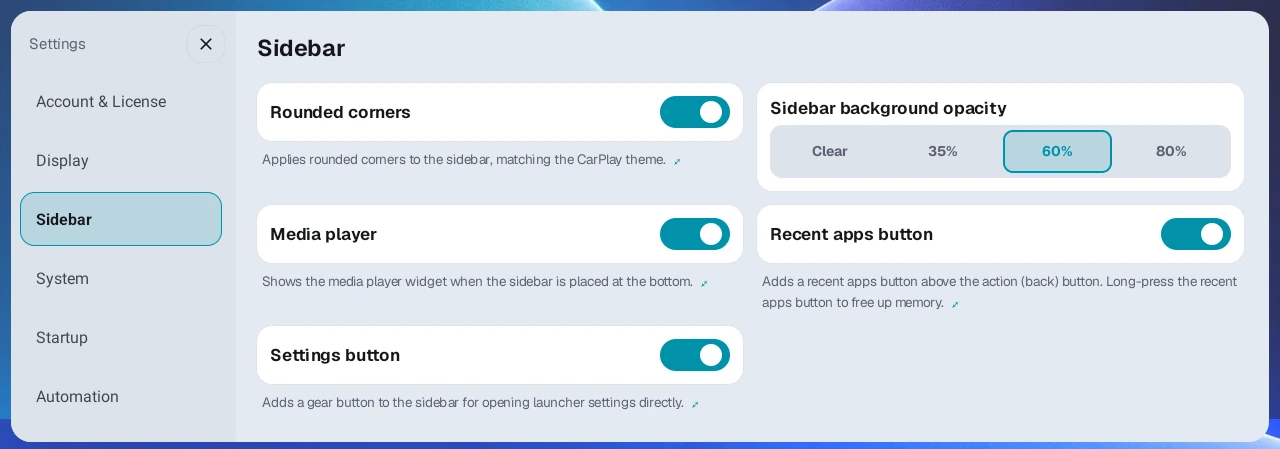
Sidebar display, media, and recent apps#
In Settings → Sidebar, adjust the following for your screen and how you use it.
-
Rounded corners: Rounds the sidebar corners.
-
Media player: Shows track info and playback controls on the bottom sidebar, and album art below the clock on the left or right sidebar. Left/right album art also needs Media app floating view turned on in Settings → Widget. Long track titles on the bottom sidebar scroll once per track and then stop; tap the title to scroll it again.
-
Recent apps button: Adds a button above the action button to open recent apps. Hold it for 1 second to clear apps that aren't currently visible and free memory. The current screen and playing music are kept.
-
Sidebar background opacity: Adjusts the opacity of the sidebar background.
-
Preset auto alignment: Automatically aligns preset icons so they aren't cut off at the screen edge.
-
Settings button: Adds a gear button to the sidebar for opening Settings directly. Off by default.
Hyperscreen bottom corner adjustment#
Adjusts sidebar button positions so they aren't hidden by the screen's lower corners. Turn on Hyperscreen bottom corner adjustment in Settings → Sidebar and adjust from 0.0 to 2.5 times the button height in 0.1 steps. The default is 1.0.
- Left/right sidebar: Moves the app drawer button upward.
- Bottom sidebar: Moves the button group, including the app drawer button, inward from the driver's end of the screen.
Adjust it if buttons are too close to the screen edge to tap comfortably.
4. Opening apps and organizing the app drawer#
Opening an app#
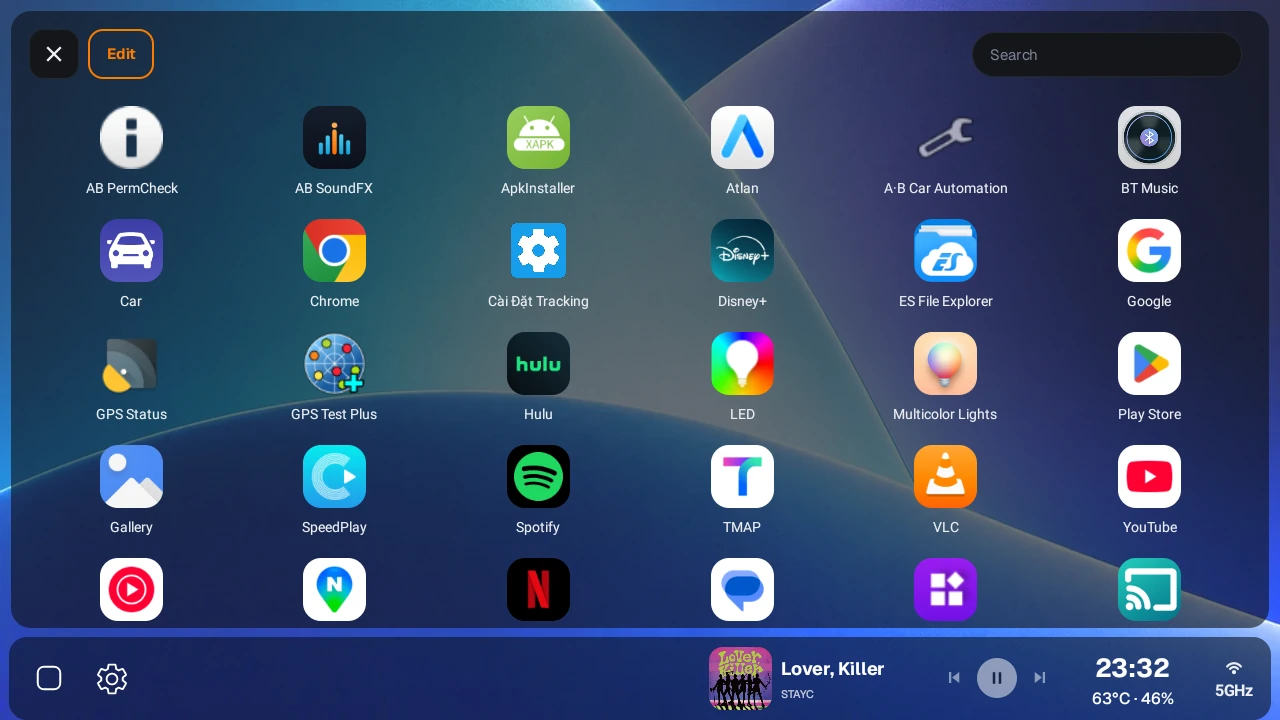
- Press the App drawer button (grid icon) on the sidebar.
- Choose the app you want to run in the app drawer.
- The app opens full screen and the app drawer closes. Your current split screen layout doesn't change. To put apps in each panel of a split screen, see chapter 5.
Searching by app name#
Type a name in the search box at the top of the app drawer to find an app right away. This helps when you have many apps and a long list to scroll.
Adjusting app size#
Press ⋮ at the top of the app drawer to find App size and Edit. Under App size, use −/+ to adjust icons from 80 to 200% in 10% steps. The default is 100%, and changes take effect immediately. This changes only app drawer icons, not the launcher UI size or panel app DPI.
Reordering apps#
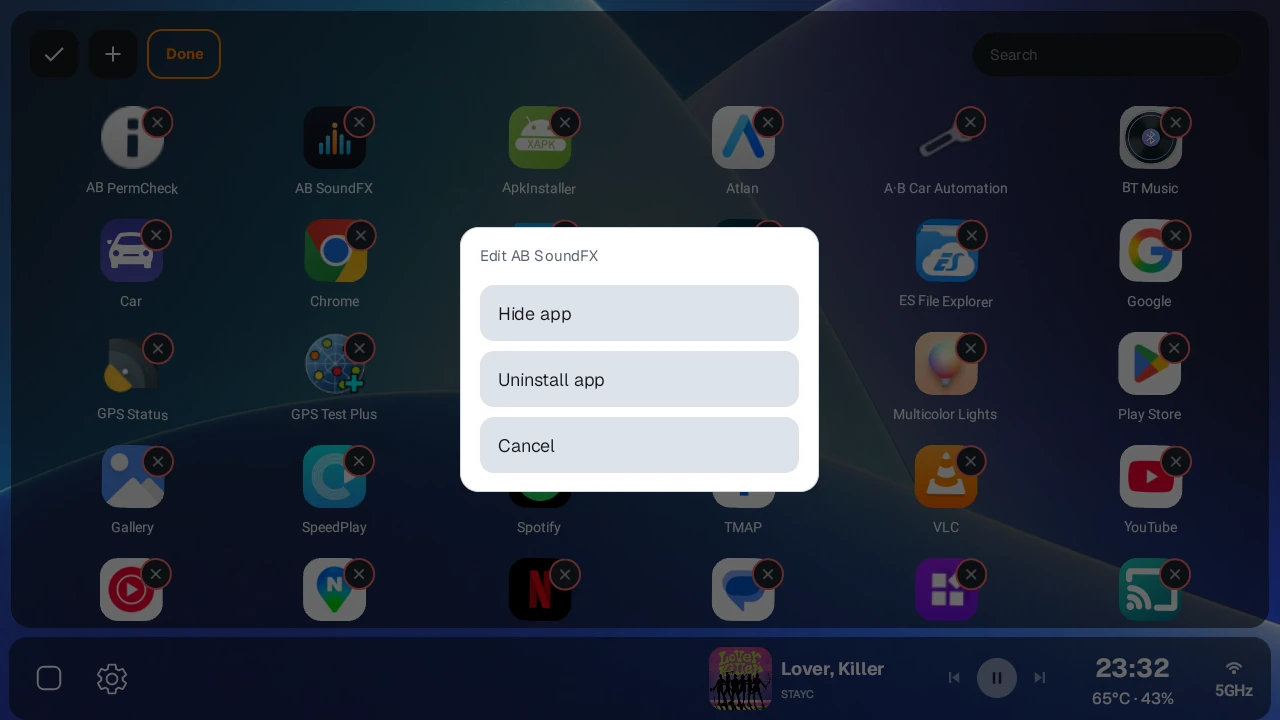
Press ⋮ → Edit at the top of the app drawer or long-press an app icon to enter edit mode. Drag icons to reorder them, and use their X badges to hide or uninstall apps. Press the check button at the top when you're done. Edit mode also ends if you tap an empty space or do nothing for 20 seconds.
Hiding apps#
- Open edit mode with ⋮ → Edit at the top of the app drawer.
- Press the X badge on the app you want to hide and choose Hide app.
- Hidden apps disappear only from the app drawer. They still appear in the app picker opened by tapping an empty panel.
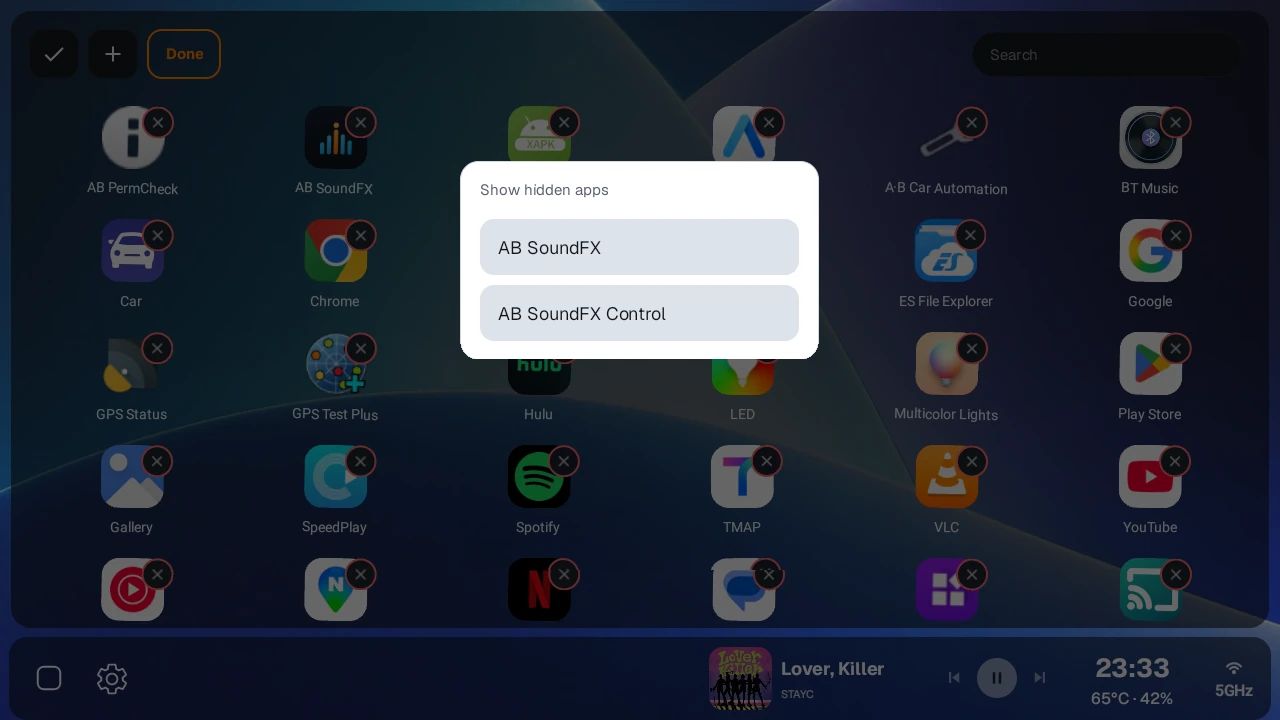
Showing hidden apps again#
- Open edit mode with ⋮ → Edit at the top of the app drawer.
- Press the + button at the top (Show hidden apps).
- Select an app to show it in the app drawer again.
Uninstalling apps#
In app drawer edit mode, press an app's X badge and choose Uninstall app. A confirmation dialog asks 'Uninstall "<app name>"?'. Press Uninstall app in the confirmation dialog and the app is uninstalled right away, with no extra screen. For system apps (including updated system apps), pressing Uninstall app only shows 'System apps cannot be uninstalled' and nothing is removed. If uninstalling fails for any other reason, 'Failed to uninstall the app' appears.
Opening instance apps (full screen)#
Add apps you open briefly and often, such as Android settings, to the sidebar next to the app drawer and open them in full screen inside the launcher. These shortcuts appear while the app drawer is open. They are separate from Launch single app presets used to save a screen configuration.
- Open the app drawer and press + on the sidebar to choose an App to open in full screen. This works on left, right, and bottom sidebars.
- Press a saved icon to open the app in full screen inside the launcher.
- Press the same icon again to hide the app and return to the app drawer. With Preset switching set to Pause, the app is kept; with Force stop, it is closed.
- Returning to the home screen closes apps opened this way and frees their memory.
Long-press a saved icon to add or remove shortcuts. In edit mode, use + in an empty slot to add one and an X badge to remove a shortcut. Removing a shortcut does not uninstall the app. Press an icon or close the app drawer to finish editing.
An app already running in a visible panel or a hidden media playback screen cannot open again in full screen. Use its existing screen or the media app floating view instead.
5. Building a split screen#
The basic steps for building a split screen in AB Launcher are choose a layout → choose a ratio → choose an app or widget for each panel → readjust the ratio if needed.
When you build a split screen for the first time, first decide how to divide the screen, then choose an app for each panel one at a time. To use the finished screen again later, save it as a preset as described in chapter 6.
Step 1: Open the layout templates#
- On the main screen, press and hold the App drawer button on the sidebar.
- When the menu opens, press Pick a layout template.
- On the Layout templates screen, choose the split you want.
A short press on the app drawer button opens the app drawer, and a long press opens the menu for building a split screen. From this menu you can also run Full reset (closes all apps and restarts). If the menu doesn't open when you press and hold, check that Enable full reset is on in Settings → Sidebar (on by default). If this switch is off, the whole long-press menu won't open, so you can't use Pick a layout template either. The menu also doesn't open while the Settings screen is open.
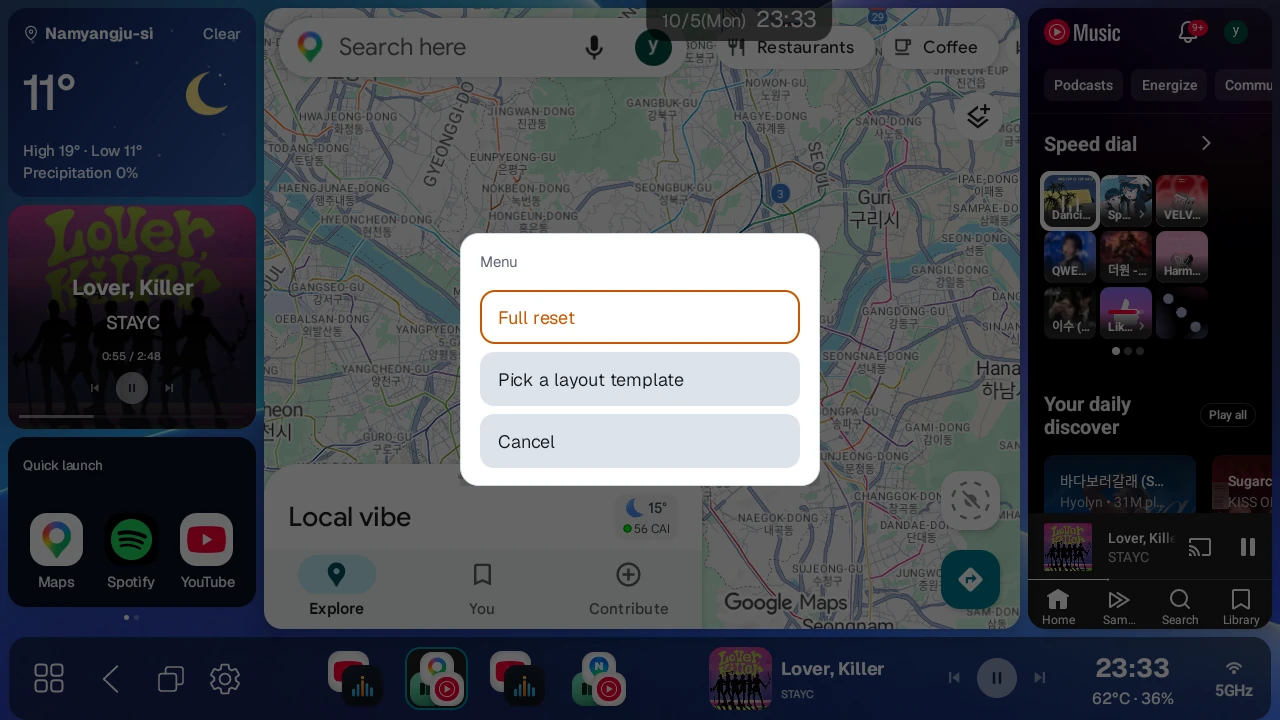
Step 2: Choose the number of panels and the direction#
On the Layout templates screen, choose one of the following.
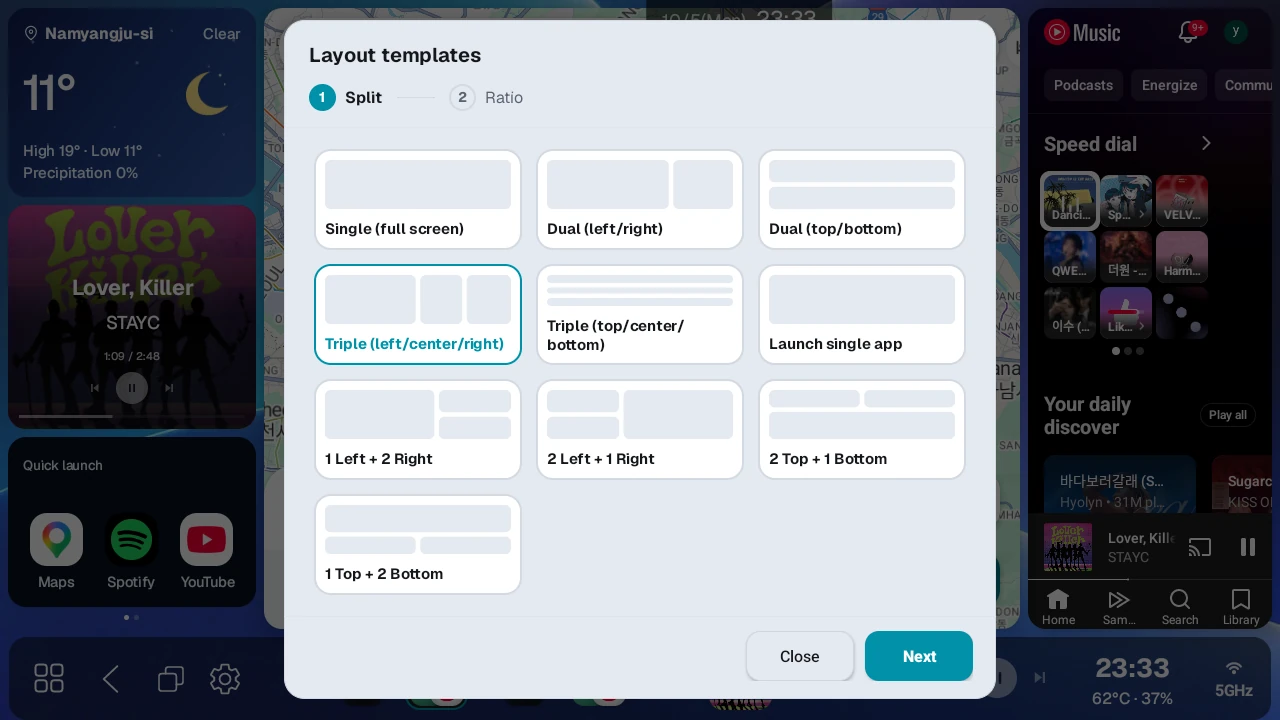
| Option | Screen layout | Panels to fill | Example |
|---|---|---|---|
| Single (full screen) | Uses the whole screen as one | 1 full screen app | One large navigation app |
| Dual (left/right) | Divides into left and right | Left, Right | Navigation on the left, music on the right |
| Dual (top/bottom) | Divides into top and bottom | Top, Bottom | Map on top, music below |
| Triple (left/center/right) | Divides into left, center, and right | Left, Center, Right | Navigation, music, and a helper app |
| Triple (top/center/bottom) | Divides into top, center, and bottom | Top, Center, Bottom | 3 apps on a portrait monitor |
| Mixed 3-way split (1 Left + 2 Right / 2 Left + 1 Right) | One side holds 1 app, the other side holds 2 apps (top and bottom) | 1 large panel, 2 small panels | Large navigation, small music and video |
| Mixed 3-way split (2 Top + 1 Bottom / 1 Top + 2 Bottom) | Top or bottom holds 1 app, the other holds 2 apps (left and right) | 1 large panel, 2 small panels | 3 apps of different sizes on a portrait monitor |
| Launch single app | Runs a single app without building a split screen | 1 app to run | Shortcut to an app you use often |
You can fill the empty panels in any order. The screen has no card called 'Mixed 3-way split'. Instead there are four cards, 1 Left + 2 Right, 2 Left + 1 Right, 2 Top + 1 Bottom, and 1 Top + 2 Bottom, so pick the card with the shape you want.
Unlike a 3-way split, which lines up three panels in one direction, a mixed 3-way split combines one large panel and two small panels in the direction you choose. In the ratio step, you can set the ratio between the large panel and the other two, and the ratio between the two small panels, separately.
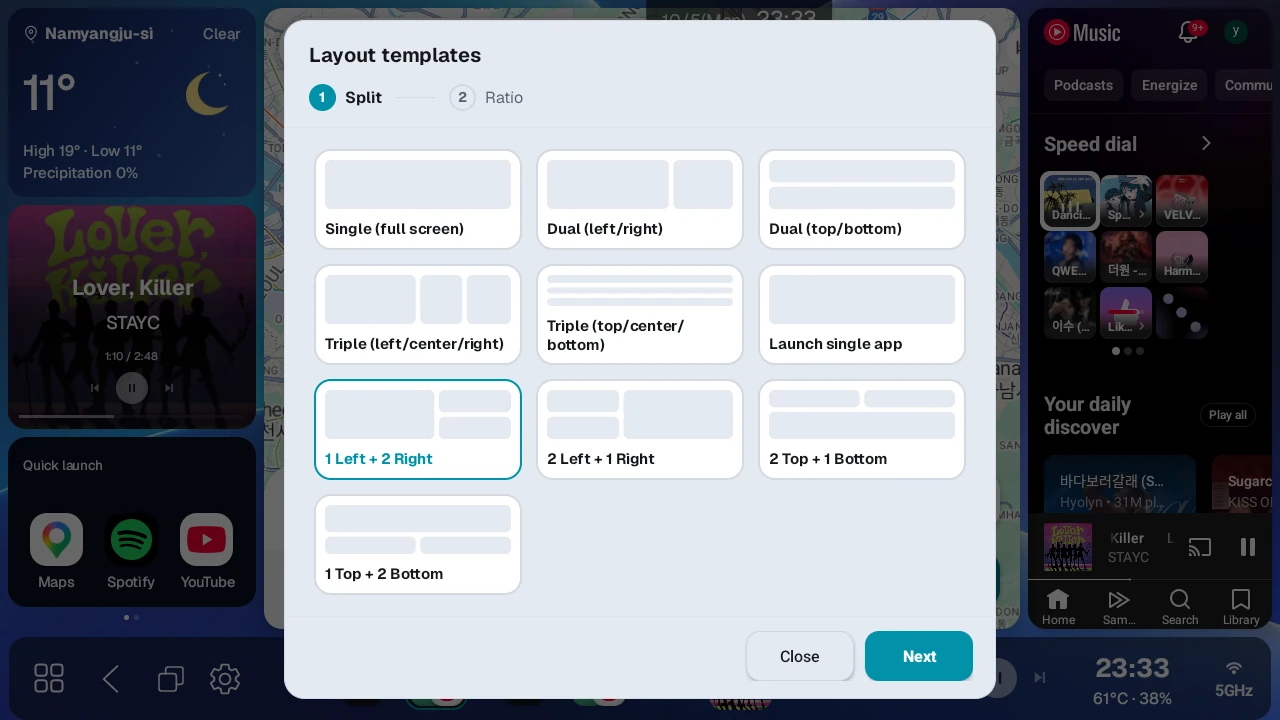
Use these guidelines to choose.
- To use navigation and music together on a wide screen, Dual (left/right) is the safest choice.
- On a portrait monitor, Dual (top/bottom) is easier to view.
- To use navigation, music, and video or a helper app at the same time, choose a Triple layout.
- To use one app large, choose Single. To make a sidebar shortcut that opens a single app directly, choose Launch single app.
Step 3: Set the split ratio#
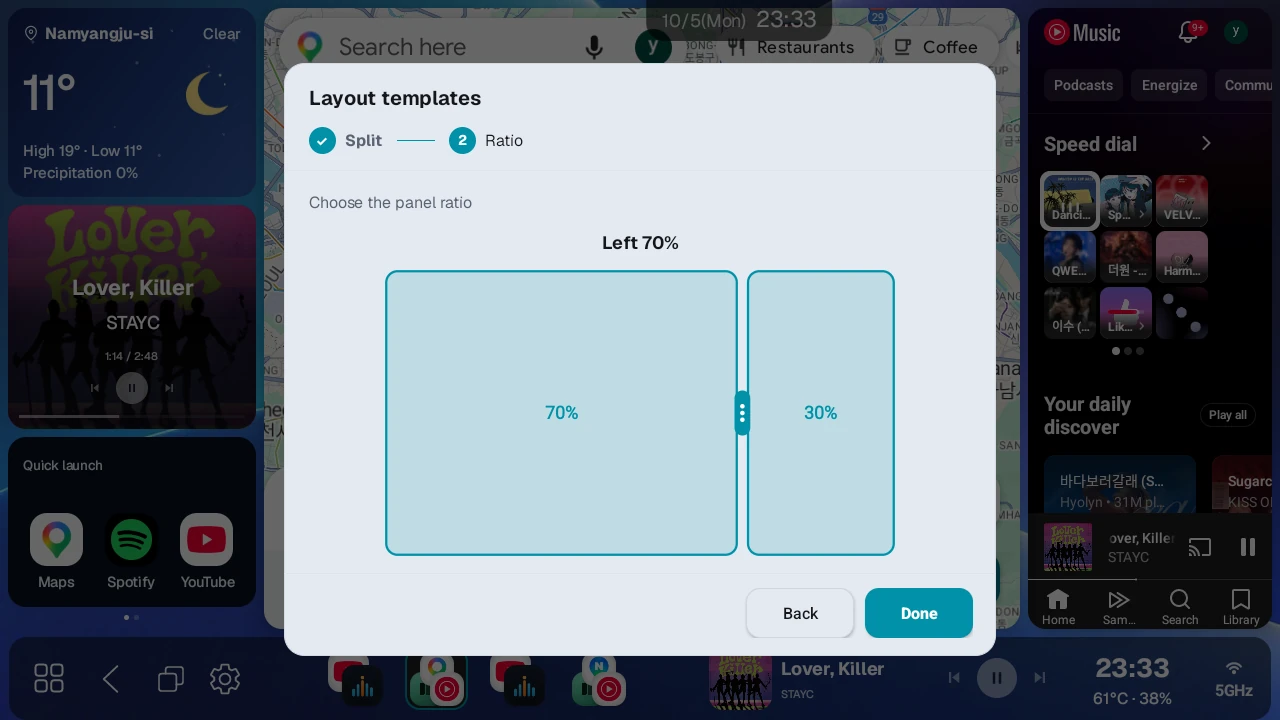
When you choose a 2-way or 3-way split, you set the ratio of each panel in the next step. The ratio can only be adjusted so that no panel is narrower than 20%. In a 2-way split, the first panel can be set from 20 to 80%. In a 3-way split, all three panels must be at least 20%. In a mixed 3-way split, each of the two dividers moves within 20 to 80%. If a divider stops moving while you drag it, it has reached this limit.
2-way split
- In a left/right split, the first panel is the left one.
- In a top/bottom split, the first panel is the top one.
- After choosing a card, drag the divider to set the size of the first panel.
- For example, setting 70% in a left/right 2-way split makes the left app wide and the right app narrow.
3-way split
- In a left/center/right split, drag the dividers to set the sizes of the left panel and the center panel.
- In a top/center/bottom split, drag the dividers to set the sizes of the top panel and the center panel.
- The last panel gets the remaining ratio automatically.
- For example, to use left/center/right at about 50%, 25%, and 25%, make the left panel large and the center panel small.
A Single (full screen) layout has no ratio to set, so pressing Done applies it right away. For Launch single app, pressing Done opens the app picker, and the app you choose is saved right away to the sidebar as a single app preset. Your current screen layout doesn't change, so skip step 4 below. If you already have 10 presets, you can't create a new one.
Step 4: Put an app or widget in each panel#
When you apply a layout, empty panels appear on the screen.
- Press an empty panel where you want to put an app.
- The app picker opens.
- Choose the type you want from the Apps / Widgets tabs at the top.
- Choose the app or Combo widget for that panel.
- Press the other empty panels the same way and choose their content.
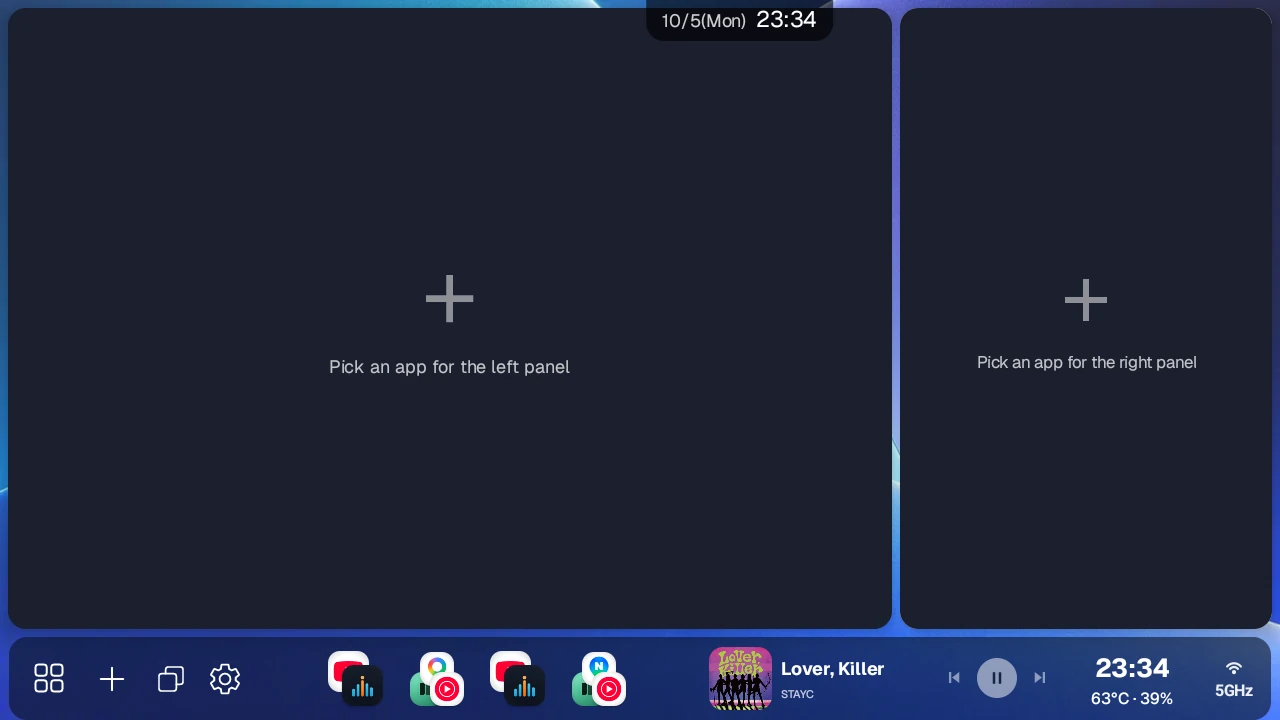
Panel names appear as Left/Right, Top/Bottom, or Center, depending on the layout you chose. Press each empty panel on the screen and choose an app.
For example, to set up Dual (left/right) with navigation on the left and music on the right, do the following.
- Press and hold the App drawer button.
- Press Pick a layout template.
- Choose the Dual (left/right) template.
- Set the ratio to about 65 to 70% and finish.
- Press the left empty panel and choose a navigation app such as TMAP or KakaoNavi.
- Press the right empty panel and choose a music app such as YouTube Music or Spotify.
- If you like the layout, save it as a preset as described in chapter 6.
Setting up and editing the combo widget#
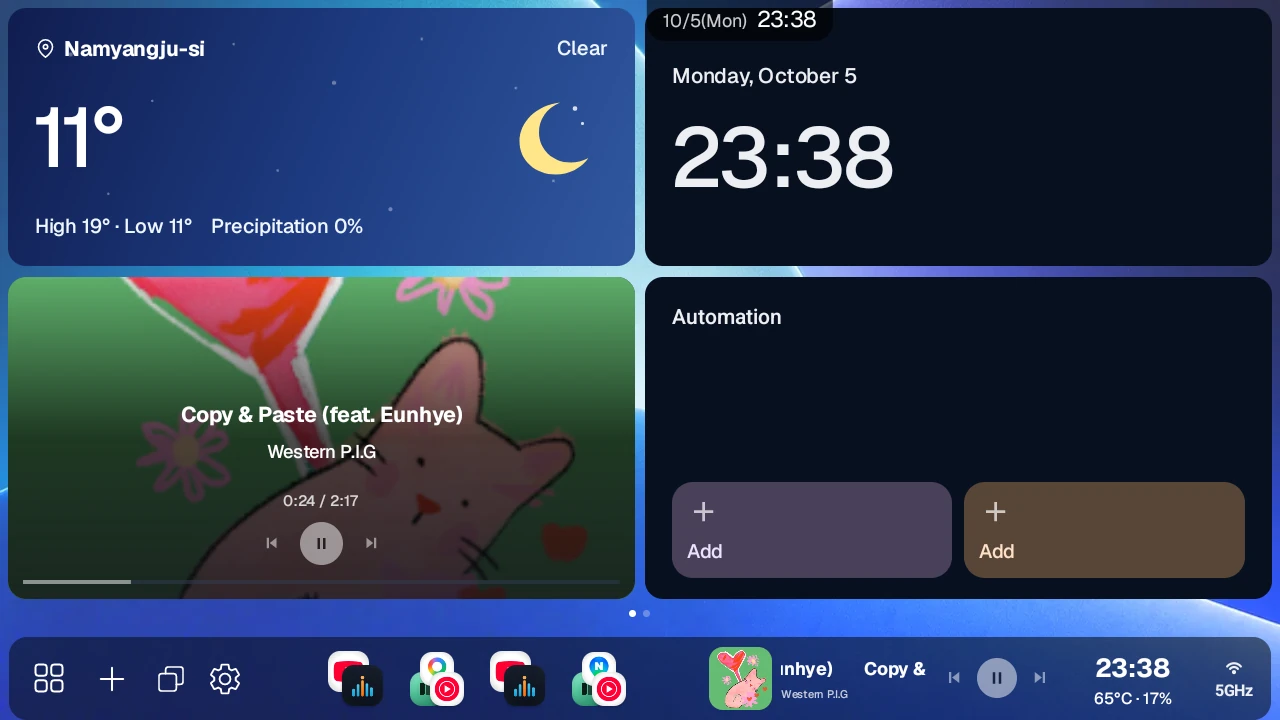
The combo widget is a responsive widget that shows several kinds of information in one panel. Turn on and reorder the sections you need from Clock, Weather, Media, Quick launch, and Automation. Cards adapt to the panel size; if they don't all fit, drag left or right to turn pages.
- Clock: Time and date
- Weather: Region and weather conditions, current, high, and low temperatures, and precipitation
- Media: Track info and album art, previous, play/pause, and next, playback time and seeking
- Quick launch: Add frequently used apps as icons and launch them
- Automation: Run saved automations from icons
Hold the widget still for about 1.5 seconds to open Widget settings, Edit icons, Change panel, and Clear panel. Edit icons appears only when Quick launch or Automation is on. Change panel lets you choose another app or widget for this panel.
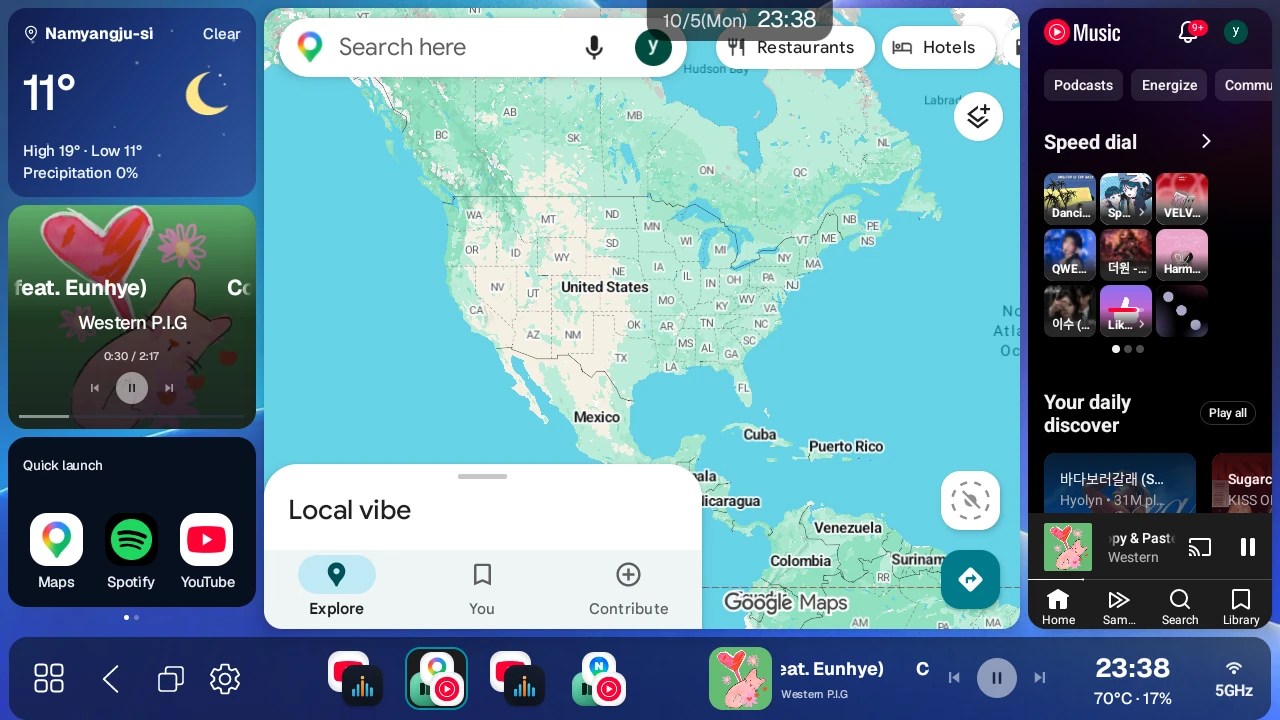
Editing widget sections and elements#
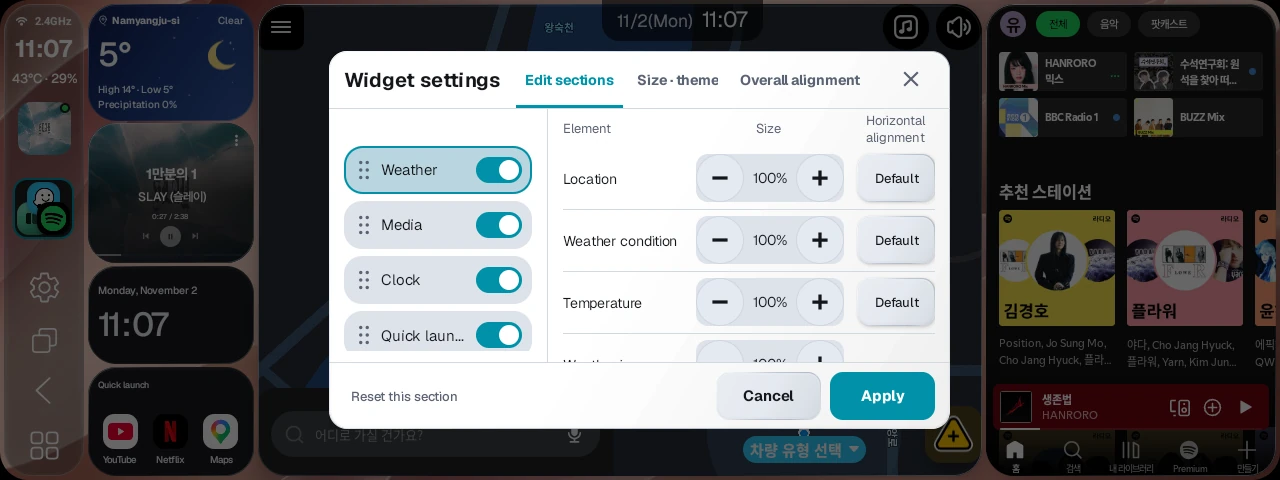
Long-press the widget and open Widget settings → Edit sections.
- Drag the left-hand list to reorder sections and use the switches to show or hide them. Order and visibility are saved immediately.
- Select a section name to see its element settings on the right. Set text size from 80 to 150% and horizontal alignment to Auto / Left / Center / Right. You can also change weather icon size.
- Toggle Show section title for Quick launch and Automation. Reset this section restores the selected section's element settings.
- Preview element changes, then press Apply to confirm. Closing with Cancel, X, or a tap outside the dialog restores the previous element settings. Order and visibility saved immediately are kept.
The Size · theme tab controls the whole widget's size and Light / Dark / Auto theme. Overall alignment controls vertical placement: Top / Center / Bottom / Even. These settings also require Apply, and Cancel reverts them. Settings are saved per preset and per panel.
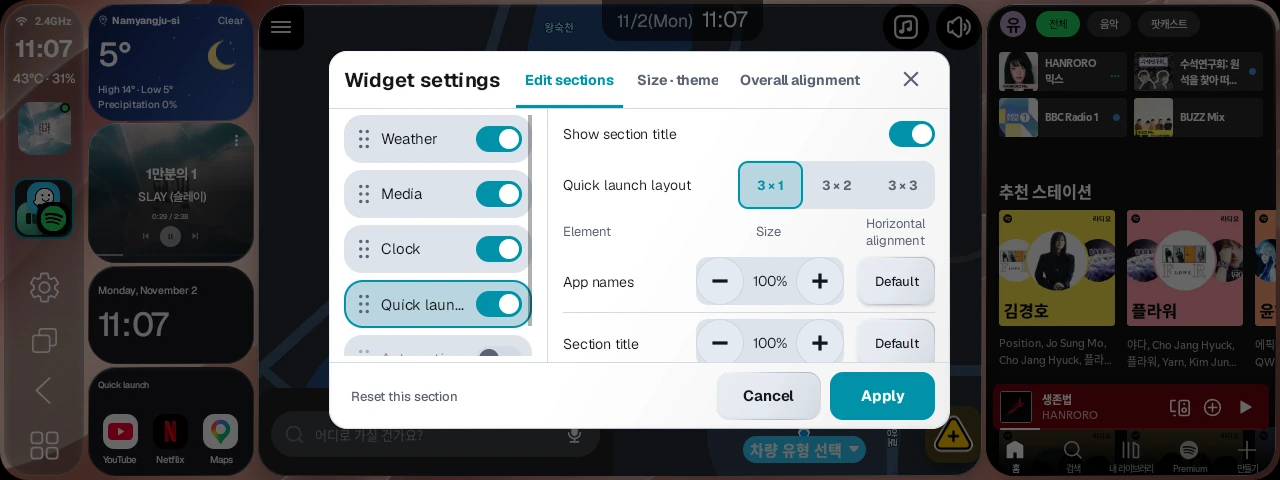
Quick launch and automation icons#
Quick launch and automation icons are saved separately for each preset. Save the screen as a preset as described in chapter 6, press it on the sidebar once, then add icons. If you haven't selected a preset, Add only asks you to select one first. Automation lists only automations for apps currently shown in panels.
In Widget settings → Edit sections → Quick launch → Quick launch layout, choose 3 × 1 / 3 × 2 / 3 × 3. The default is one row (3 × 1), with up to 9 apps. Confirm with Apply. Reducing the number of rows doesn't delete saved apps; increasing it again brings hidden apps back.
Starting music from a widget#
The media section can start music with its play button even when nothing is playing. If no music app is set, it opens Pick a music app. You can also set Music app in Settings → Widget in advance. Playback may not start if you aren't signed in to the app or it has no recent playback history.
To change the app, long-press the play button while the media section is idle. Some apps that weren't previously classified as music apps, such as Apple Music, also appear in the picker.
New widgets use the dark theme by default. Change it with Default theme for new widgets in Settings → Widget. A theme chosen on an individual widget takes priority.
Step 5: Readjust the ratio on screen#
Move a divider to resize the panels directly. You can adjust the ratio on the current screen without opening the settings.
- Find the divider between two apps.
- Press and hold the divider and drag it in the direction you want.
- Let go when the size is right.
- To keep this layout, save it as a preset as described in chapter 6.
Moving a divider does not restart the apps in the panels. They keep the screen you were viewing and only change size.
In left/center/right and top/center/bottom 3-way splits, there are two dividers. The first divider adjusts the first panel and the center panel, and the second divider adjusts the center panel and the last panel. A mixed 3-way split also has two dividers, but they run in different directions. The divider between the large panel and the two small panels adjusts the size of the large panel, and the divider between the two small panels adjusts the ratio between them.
Swapping panels (swap and cross)#
After you split the screen, press and hold a divider to switch the panels on either side.
- Press and hold a divider for about 1.5 seconds to run a swap or a cross, depending on where you press.
- Press the upper half of a vertical divider (between left and right) or the left half of a horizontal divider (between top and bottom) to swap: the apps change places and each panel keeps its size.
- Press the lower half of a vertical divider or the right half of a horizontal divider to cross: the apps and the panel size ratio are exchanged together.
- You can also double-tap the divider to run the same action right away. Where you tap the second time decides swap or cross, and no menu opens.
- In a 3-way split, you can switch two neighboring panels.
Switching places doesn't reload the apps. The panels move smoothly to their new spots, and playing video or navigation screens keep running.
Drag to swap with the next panel
You can also switch panels by dragging instead of pressing the divider.
- With one finger, press inside the panel you want to move and push toward the neighboring panel. The border of the starting panel lights up.
- When you cross the divider into the neighboring panel, that panel's border lights up too.
- With both panels lit, let go and the apps in the two panels switch.
- The result depends on where your finger crosses the divider. Crossing the upper half of a vertical divider into the next panel is a swap (apps only). Crossing the lower half is a cross (apps and panel sizes). On a horizontal divider, the left half is swap and the right half is cross. This is the same rule as pressing and holding the divider.
- This works for panels stacked top and bottom as well as side by side. For top and bottom panels, push up or down across the divider.
- In a 3-way split, nothing changes if you push past two panels to the far end, or come back to the starting panel and let go.
- If you're swiping inside an app (moving a map, scrolling a list, and so on) and cross the divider, it may turn into a switch. When you use an app, avoid swiping all the way to the divider.
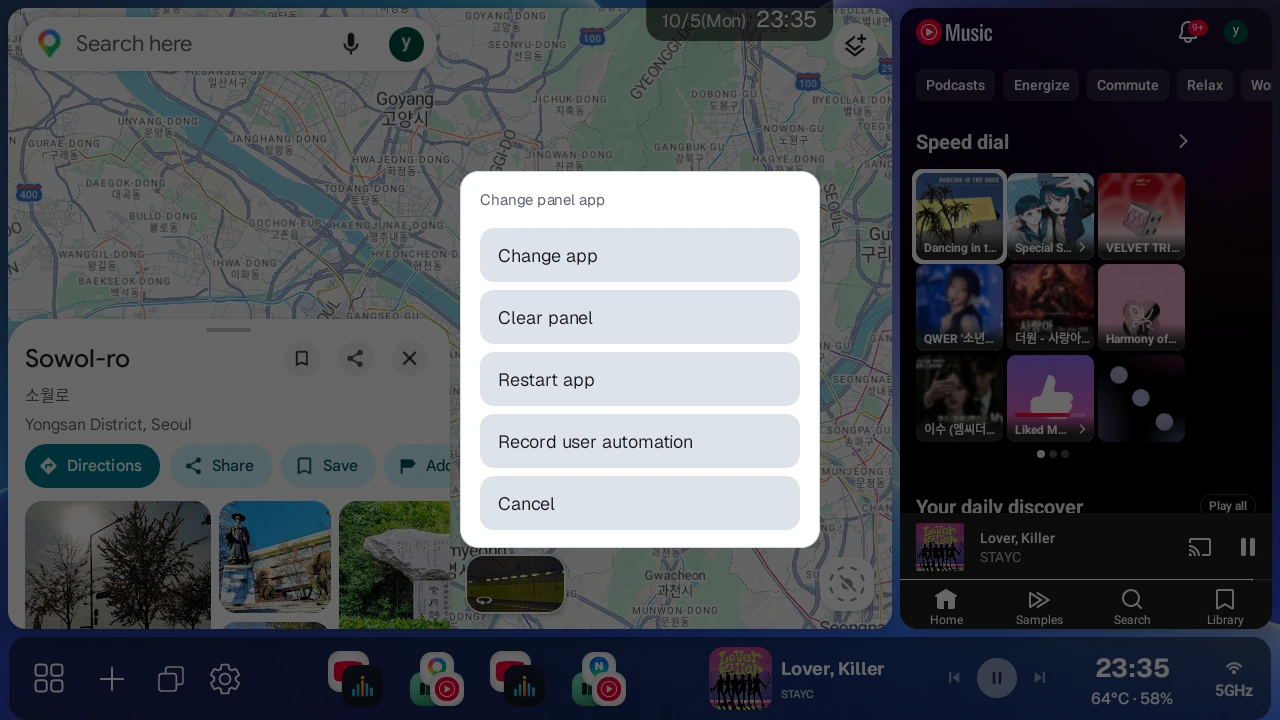
Menu that opens when you press and hold a panel#
When you press and hold the panel showing the app itself instead of the divider, a separate menu for that panel's app opens.
- Change app: Choose a new app for that panel.
- Clear panel: Returns that panel to an empty panel.
- Restart app: Restarts only that panel's app. Use it when the app isn't responding or the screen is frozen.
- Swap main ↔ opposite pane: Appears only in a mixed 3-way split (1 Left + 2 Right, 2 Left + 1 Right, 2 Top + 1 Bottom, 1 Top + 2 Bottom). It exchanges the app in the large panel (main) with the app in the lower of the two small panels (the right panel in 2 Top + 1 Bottom and 1 Top + 2 Bottom). This menu covers a combination the divider can't switch. It's a swap that keeps panel sizes and switches only the apps.
- Record user automation: Choose an automation method (Standard/Coordinate), then start recording an automation, covered in chapter 10. This appears only with a Pro license or the Beta trial and the automation helper app installed. On Android 10 and 11 devices, only Coordinate is available.
Pressing and holding a panel that shows a combo widget opens the widget menu instead of the app menu. To move a widget to the next panel, press and hold the divider to swap.
Watching video apps full screen#
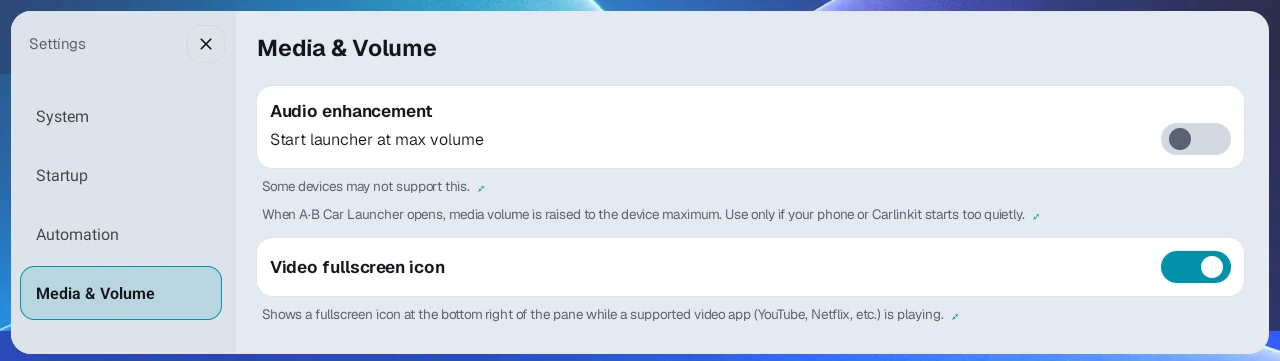
While YouTube, Netflix, Disney+, Wavve, TVING, or Watcha is playing in one panel of a split screen, tap that panel once and a fullscreen icon appears at the bottom right for 3 seconds. Press the icon and the panel expands to fill the screen, with a control bar at the bottom center.
- Cinema mode (curved screen icon): Enlarges to 125% to fill the screen.
- Original ratio (square icon): Shows at 100%.
- − / + buttons: Adjust the size in 5% steps, from 100 to 400%.
- X: Returns to the original split screen.
The control bar hides by itself after 3 seconds and comes back when you touch the screen. The first touch that brings back a hidden control bar doesn't press any button, so press again.
If this icon gets in the way during playback, turn off Video fullscreen icon in Settings → Media & Volume to hide it. The default is on.
Zooming video inside a panel#
Enlarge video inside its panel without switching the video app to full screen. This requires Android 13 or later and Video fullscreen icon turned on in Settings → Media & Volume.
- Tap the panel where the video app is playing.
- Press ⋮ beside the fullscreen icon at the bottom right.
- Choose Fill (125%), Original ratio (100%), or −/+ on the control bar. −/+ adjusts from 100 to 400% in 5% steps.
- X closes the control bar. Press Original ratio to return to the original scale. In a narrow panel, the Fill and Original ratio buttons are hidden; press the % number in the middle to return to the original ratio (100%).
The menu may not appear if the panel is too narrow or the output method isn't supported. Zoom may reset when the panel size or app changes.
Setting the default split ratio#
Default split ratio in Settings → Display sets the share of the first panel in a 2-way split, from 20 to 80%. The default is 70%. Move the slider, then press Apply to save.
This value is used only when no 2-way split ratio has been saved yet, so it doesn't affect the screen you're viewing or a template you choose next. A ratio you set once by dragging a divider or with a template or preset always takes priority, and the template screen also starts from the last ratio you used. It doesn't apply to 3-way or mixed 3-way splits.
Setting the divider width#
In Divider width in Settings → Display, you can set the width of the touch area for grabbing a divider from 16 to 48dp (default 24dp). Move the slider, then press Apply for it to take effect. After pressing Default, you also need to press Apply. If the divider is hard to grab with your finger, increase the value.
Common points of confusion when building a split screen#
- A short press on the app drawer button opens the app drawer, and a long press opens a menu. You reach the template screen through Pick a layout template in this menu. If you turn off Enable full reset in Settings → Sidebar, this menu won't open and you can't reach the template screen.
- Choose a layout first, then press the empty panels to add apps.
- You can set the ratio in the template step, and you can readjust it later by dragging a divider on screen.
- To bring back the screen you want in one step next time, save it as a preset as described in chapter 6.
6. Saving and managing presets#
A preset is a shortcut that saves the current screen's app arrangement, split layout, ratios, and more. You can save up to 10.
Saving the current screen as a preset#
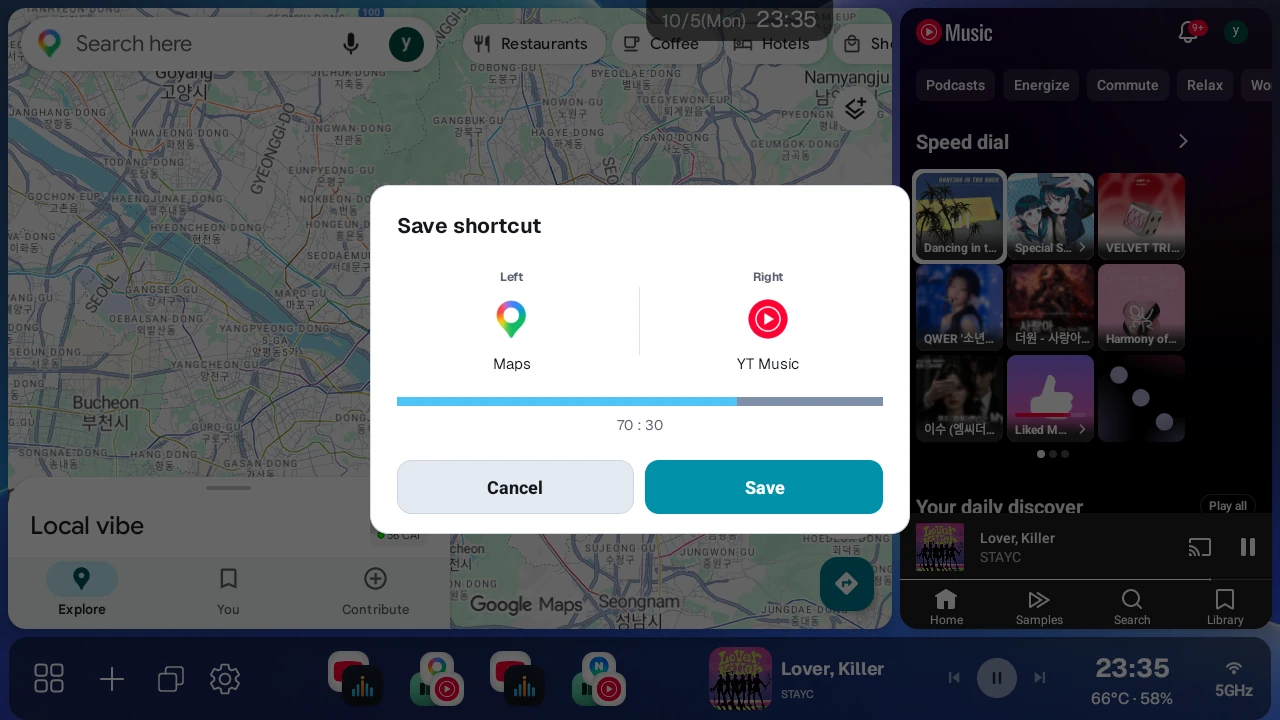
- Place the apps you want in the split screen you want.
- With no active preset, press the + button on the sidebar.
- Check the details in the save confirmation dialog, then save.
- The saved preset is added to the sidebar.
Running a preset#
Press a saved preset icon on the sidebar to reopen its app arrangement. Press the icon of the preset that is currently applied once more to close that preset's apps and launch them again from scratch. Use this like a refresh when an app screen freezes; widget panels stay as they are. Because the apps restart, app state such as the playback position may go back to the beginning.
Editing presets#
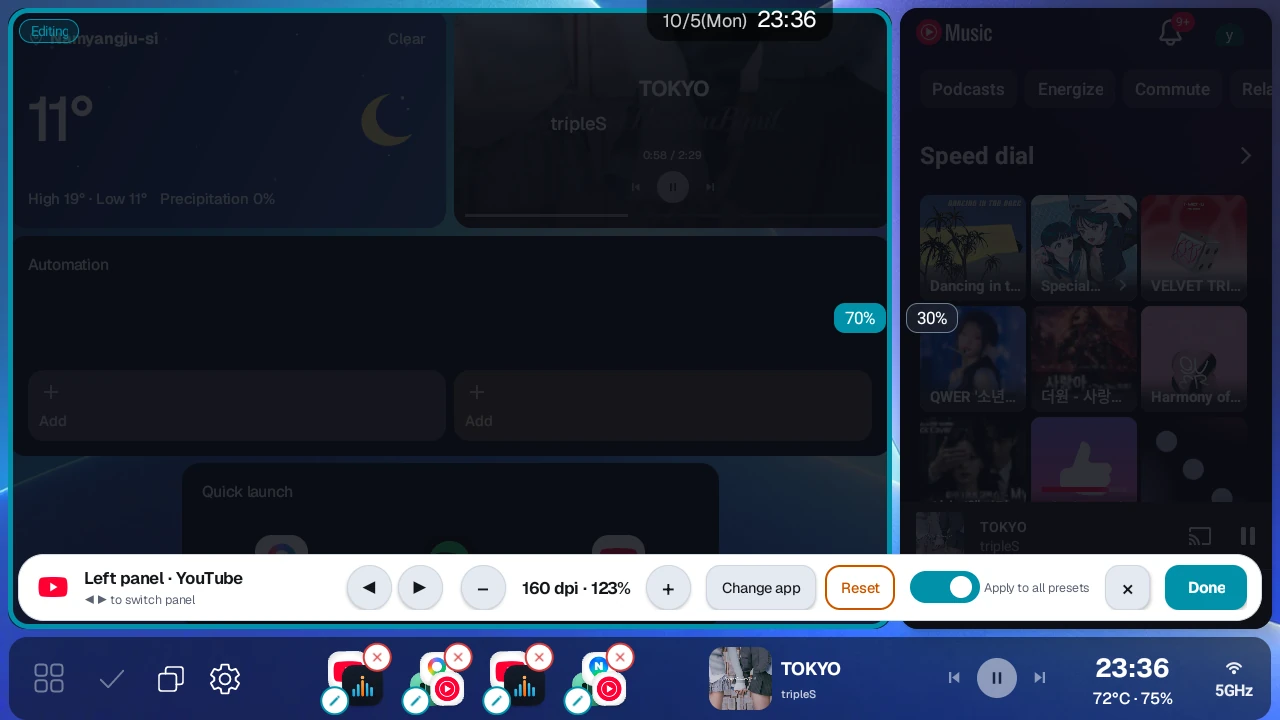
- Long-press a preset on the sidebar.
- When the preset icons wiggle and the edit and delete badges appear, you can do the following.
- Delete a preset
- Reorder presets
- Edit preset DPI
- Tap a panel on the screen to pick the panel to edit, then change the app or widget with Change app at the bottom (Change panel for a widget panel)
- When you are finished, press the Done button at the bottom.
To close only the edit screen, press the X button at the bottom. This exits without reapplying the screen. DPI values and app changes you make while editing are saved to the preset as soon as you adjust them, so pressing X does not undo them. The Apply to all presets toggle takes effect only when you press Done. If you do nothing for 20 seconds, edit mode closes automatically the same way as X.
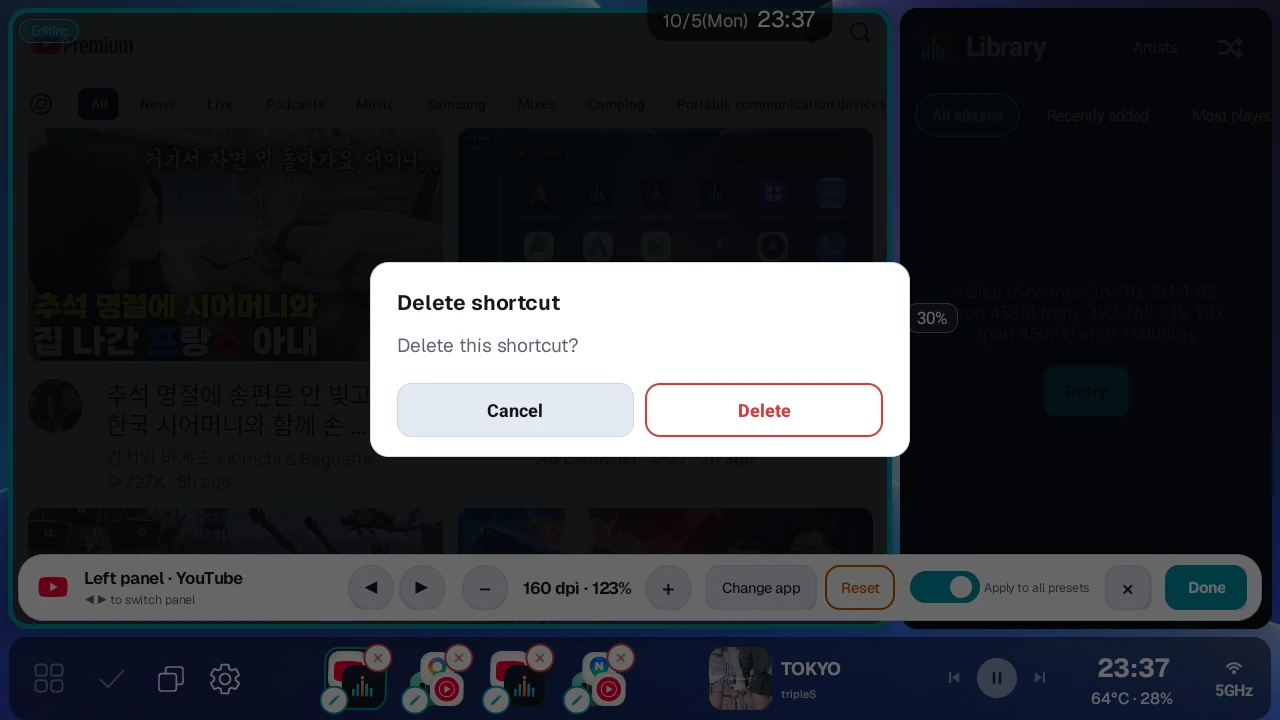
Press the X badge on a preset to open a delete confirmation dialog.
Per-preset DPI editing#
You can adjust the screen density (DPI) of the panel apps in a preset separately for each preset.
- If text and buttons are too large, try lowering the DPI value.
- If an app looks like a phone screen or appears too small, adjust the DPI value to fit.
- The default is set automatically to match the screen resolution, so start from the default and adjust in small steps.
- The Apply to all presets toggle is on each time you start editing. If you press Done with it on, this DPI value also applies to other presets that contain the same app (except single-app presets). To apply it only to the preset you are editing, turn the toggle off, then press Done. Widget panels do not have this toggle.
Single-app presets#
You can also make a preset that opens just one app. Choose Launch single app in step 2 of Chapter 5 and press Done to open the app picker. Pick an app and it is added to the sidebar right away, with no save confirmation dialog. Pressing this preset opens only that app in full screen and leaves your current split screen as it is. In edit mode, DPI editing is not shown, and pressing the edit badge lets you change the app to launch. This suits apps you often open on their own, such as the device settings app or video apps.
7. Using the sidebar action button#
The sidebar action button changes its role depending on the current state.
| State | Button shown | Action |
|---|---|---|
| No active preset | + button | Save the current screen as a preset |
| Preset applied | Back button | Send Back to a panel app |
| Editing a split preset | Done (check) button | Finish editing and apply the preset (same as the Done button at the bottom) |
With the back button, you can close menus or go back a screen inside a panel app without touching the app screen. The target depends on how you press it.
- Short press: Sends Back to the app panel you touched last. If you have not touched a panel yet, or the last panel you touched is a widget or empty panel, the first app panel is used.
- Long press: Sends Back to the second app panel. If there is only one app panel (a Single (full screen) layout, or the other panels are widgets or empty), nothing happens.
Here, first and second refer to the order of app panels counted from the left (top) panel. In a mixed 3-way split, the large panel is first. Widgets and empty panels are not counted.
The back buttons on the floating ball and the Ultra3 round widget follow the same rules while the launcher screen is showing. When another app is running in full screen, both a short press and a long press send Back to that app. The floating ball is hidden on the launcher screen by default, so to use these rules on the launcher screen, turn on Always show (incl. launcher) in Settings → Sidebar.
8. Display and system settings#
Settings is divided into the following categories.
Account & License · Display · Split Apps & Touch · Sidebar · System · Startup · Automation · Steering buttons · Media & Volume · Widget · Ultra3 · OEM Settings · Lab · Manual
Ultra3 appears only on devices with an auxiliary display, and Automation only with a Pro license or the Beta trial. OEM Settings appears on all devices, while some items inside it appear only on supported devices.
Language#
Choose the launcher's display language under Language in Settings → System.
- Auto follows the device's system region and language.
- 15 languages are supported in total, including Korean, English, Japanese, Chinese, and German.
Display mode (Dark · Light)#
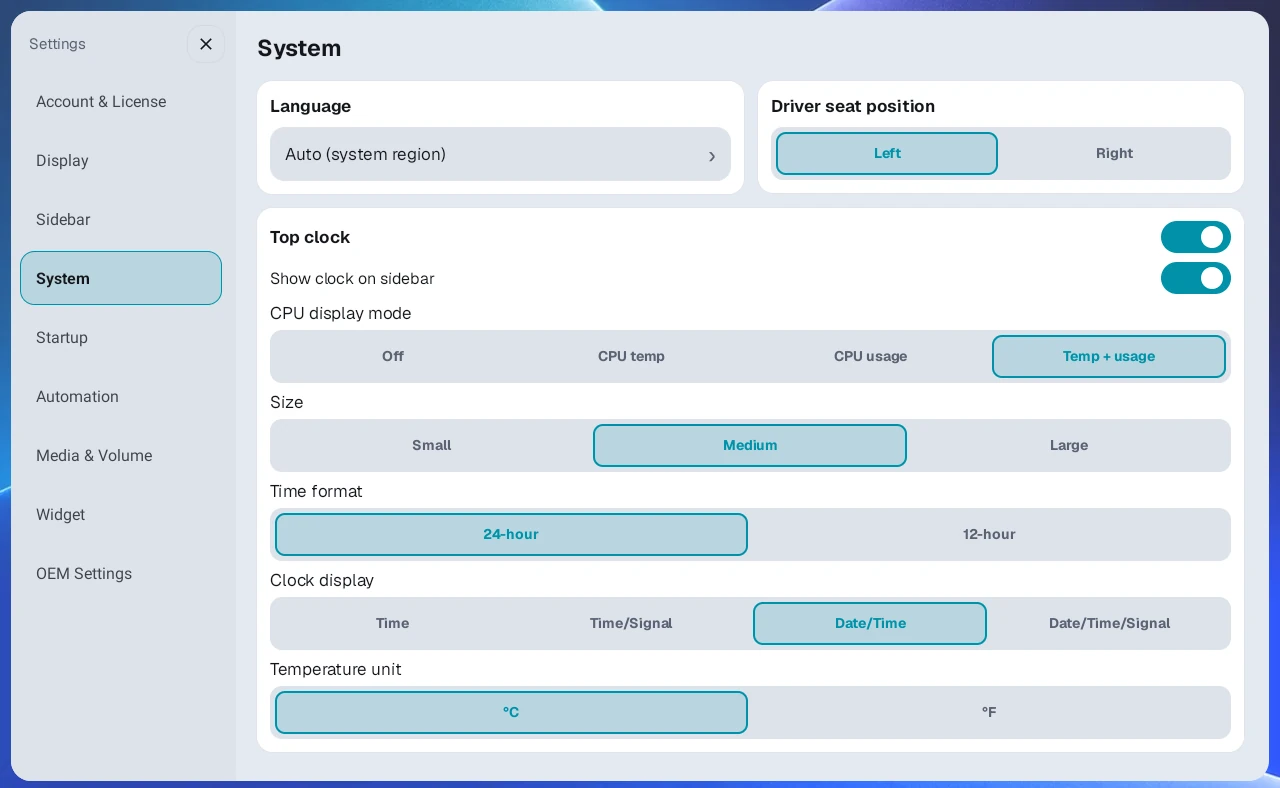
In the Settings → Display category, choose Dark or Light under Display mode and press Apply, then press Apply again in the confirmation dialog. The launcher restarts with the new colors. If you cancel in the confirmation dialog, the selection goes back to the original mode. The chosen mode also applies to the launcher's dialogs and the Settings screen, but not to the Ultra3 round auxiliary display.
Launcher UI size#
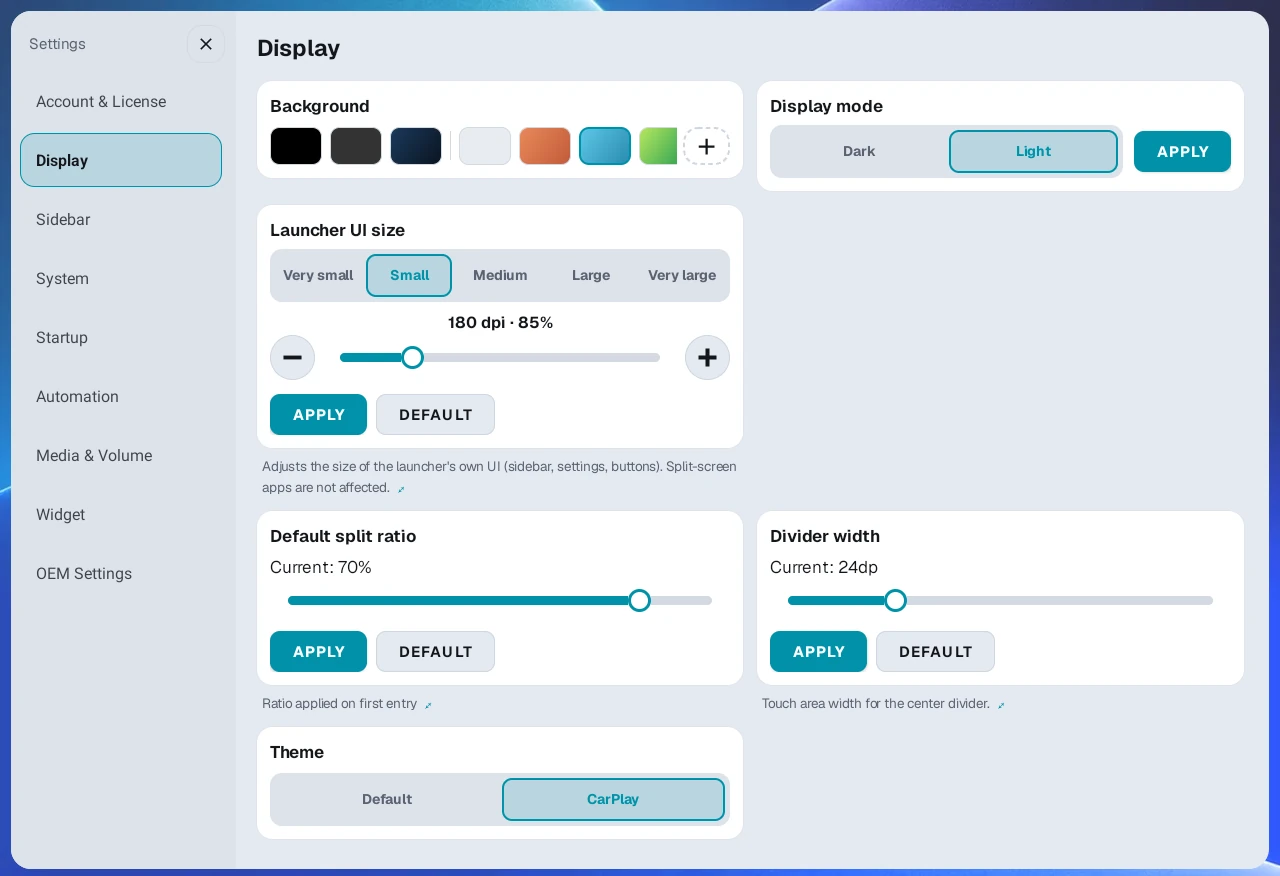
If buttons and text are too large or too small, adjust Launcher UI size in Settings → Display. Pick quickly with the five-step buttons or fine-tune with the slider and −/+ buttons. This adjusts the launcher's text and buttons separately from the device's screen resolution. To calculate them from the displayed screen size, also check Size UI to visible screen below.
Press Apply and the launcher restarts at the new size. Startup automation does not run when the launcher restarts to apply a setting like this. Startup automation runs only when you turn on the device or the launcher starts completely fresh.
Settings → Display is also where you set Default split ratio, Divider width, Theme, and Background.
UI size based on the displayed screen#
Turn on Size UI to visible screen in Settings → Display to calculate text and button sizes from the screen size actually displayed. Check this if the device's internal screen information differs from your car display and the UI looks too small or too large.
Changing the switch opens a confirmation dialog. Confirming reloads the launcher screen and panel apps; music may pause briefly. It is on for new installations. After an update, it keeps the value you chose before, or stays off if you never chose one. This, Launcher UI size, Sidebar size, and panel app DPI are separate settings.
Widget#
Settings → Widget sets common behavior for combo widgets.
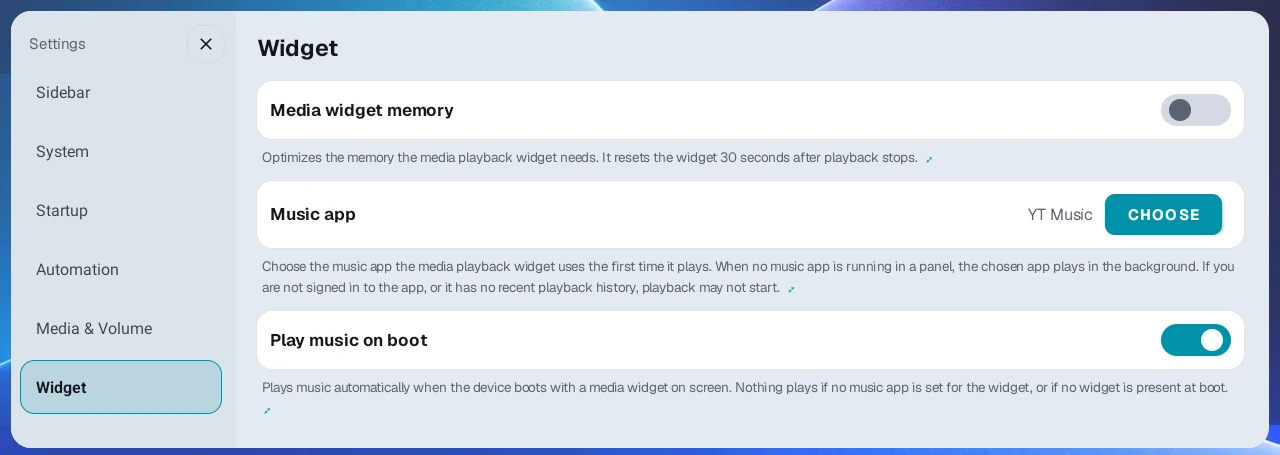
- Default theme for new widgets: Choose Dark / Light / Auto. It applies immediately to new widgets and existing widgets with no individually chosen theme. Widgets with their own theme keep that choice.
- Music app: Sets the app used when starting playback from the media section. Playback may not start if you aren't signed in or the app has no recent playback history.
- Play music on boot: When turned on, starts playback in the selected Music app when the device boots, even without a media widget on screen. It is off by default. It doesn't play if no music app is selected or if other audio is already playing.
- Media widget memory: Resets the media widget 30 seconds after playback stops to free its dedicated memory. Most devices do not need this turned on.
- Weather region: Choose the region for the weather section and Ultra3 round display. Auto (GPS) finds it automatically; without GPS reception, choose a province or city and district manually. A manual region takes priority. Turning off GPS removes Auto (GPS) and replaces an existing Auto selection with the first province or city.
- Weather refresh interval: On the Weather region card, choose 5 / 10 / 15 / 20 / 30 / 60 minutes. The default is 5 minutes. This doesn't guarantee that the place name changes immediately as you travel.
- GPS: See the Using GPS section below.
Media app floating view#
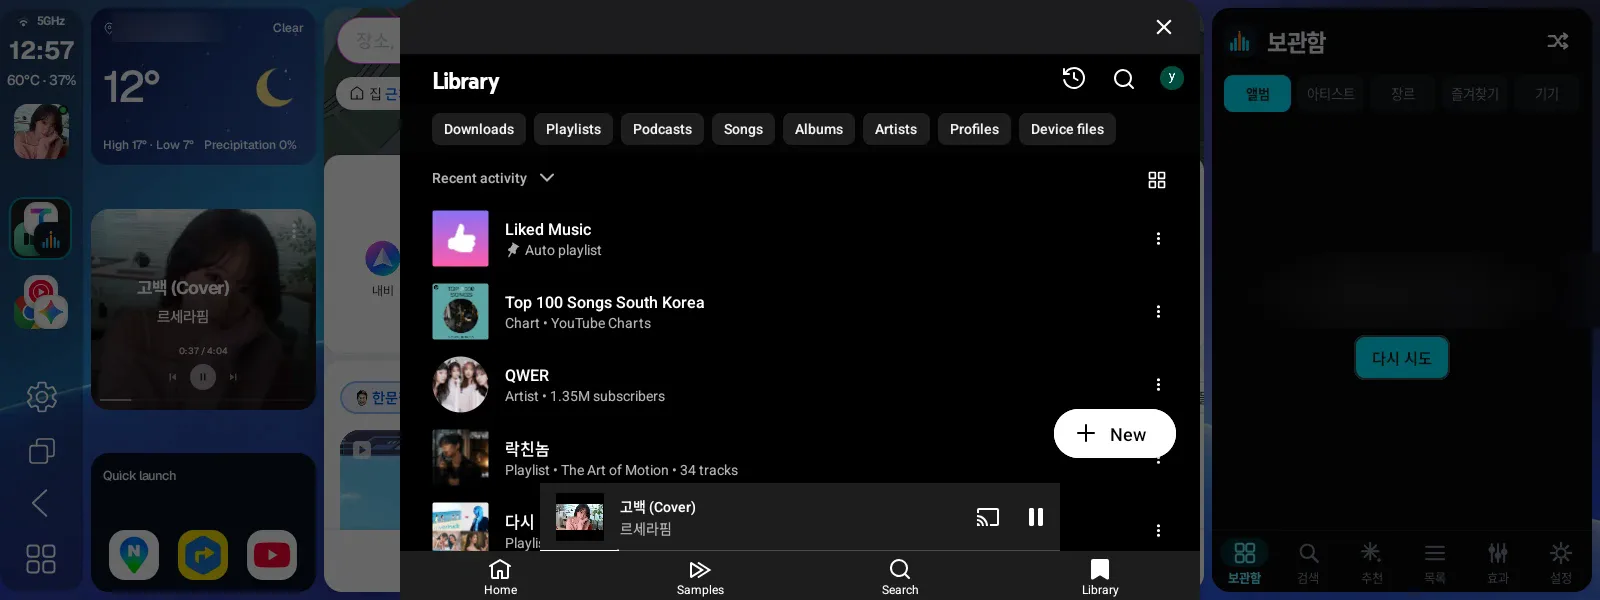
Open the playing music or video app from the bottom to control it without changing your panel layout. Turn Media app floating view on or off in Settings → Widget. It is off by default.
- Left/right sidebar: Tap the album art below the clock. Media player in Settings → Sidebar must also be on for the art to appear.
- Bottom sidebar: Tap the media player's album art.
- Combo widget: Press ⋮ in the media section.
- Steering button: Assign Open/close media app floating view.
A green dot appears on the album art when the view can open. It can't open if the playing app is already in a visible panel or no media is playing.
Supported on Android 12 and later. Android 10 requires Split-screen compatibility mode in Lab to be on. Android 11 is not supported.
Screen density (DPI) for panel apps#
The screen density (DPI) that panel apps receive is adjusted with per-preset DPI editing in Chapter 6. Settings has no separate item for this value.
- A higher value can make the app UI look larger.
- A lower value can give a wider, tablet-like UI, but text and buttons may get smaller.
Startup screen#
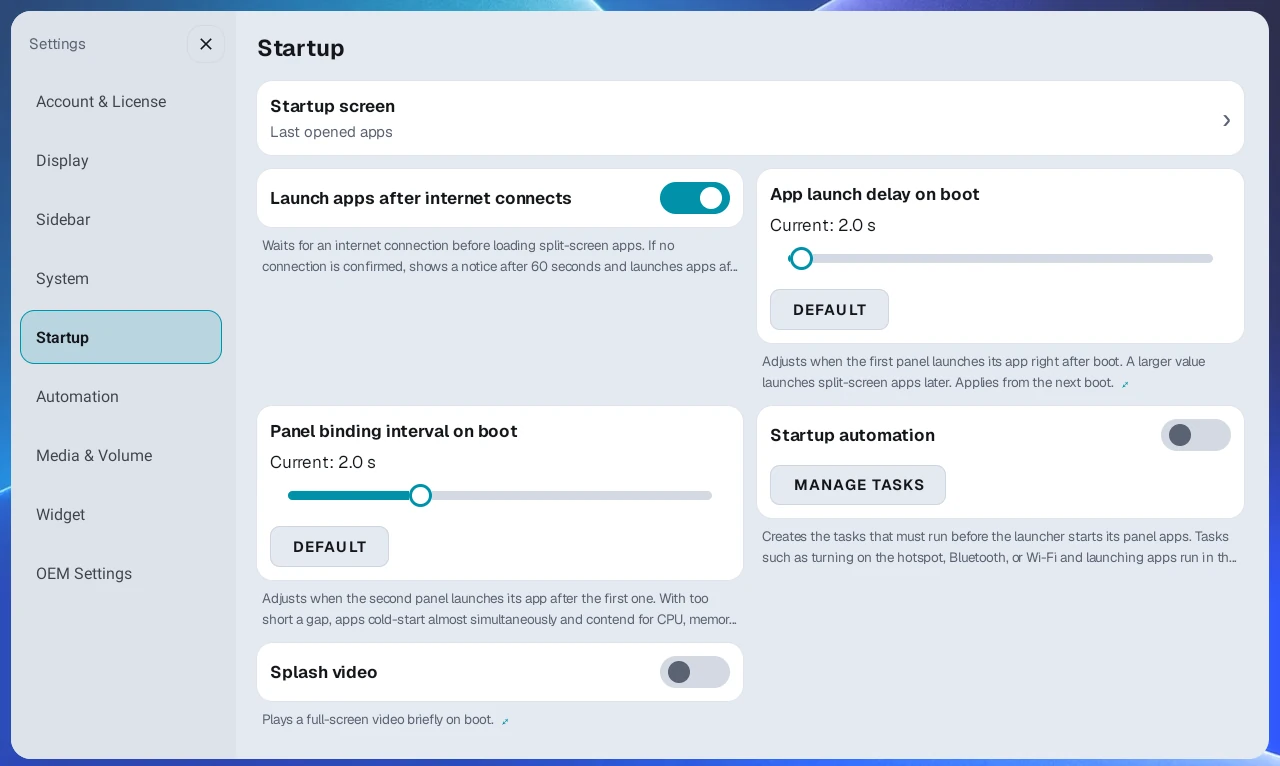
In Settings → Startup, use Startup screen to choose which screen to start with when you turn on the device or the launcher starts fresh. The default is Last opened apps, and single-app presets are not listed.
- Last opened apps: Starts with the app arrangement you used last.
- Start with a preset: Starts directly with the preset you choose.
Clock display#
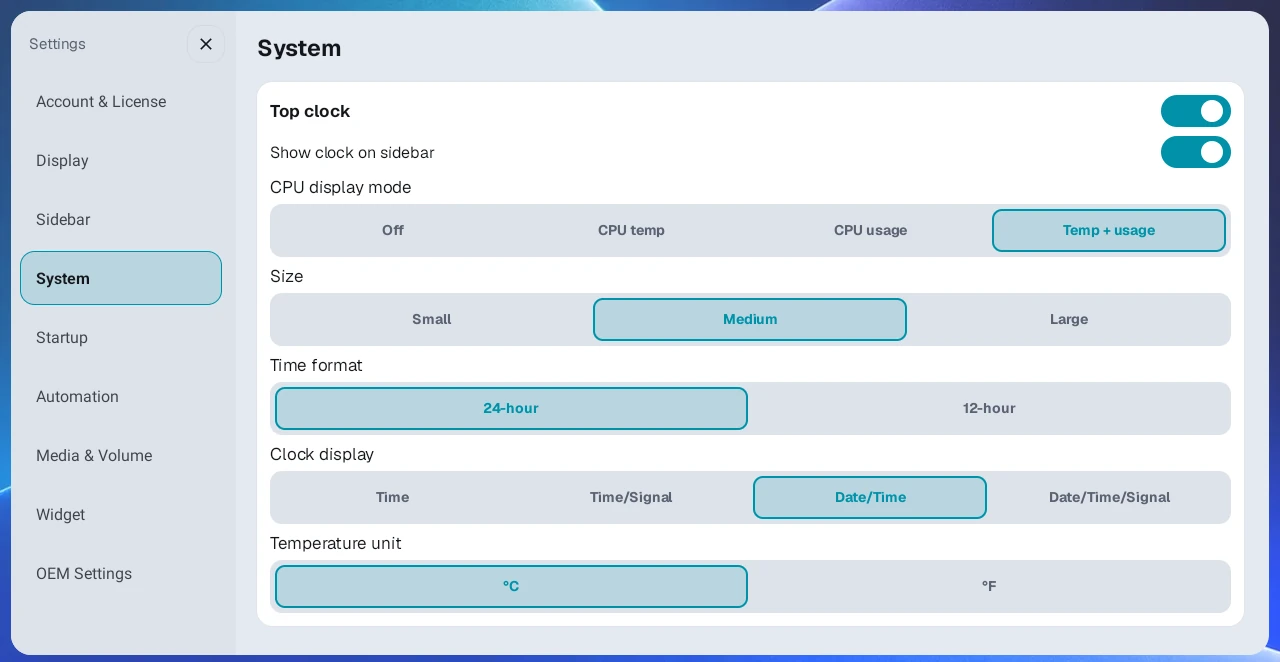
- Turn the top clock on or off.
- Turn the sidebar clock on or off separately.
- Choose the top clock's Size from Small / Medium / Large.
- Choose the Time format: 12-hour (e.g. 3:20) or 24-hour (e.g. 15:20).
- Under Clock display, choose the combination you want from four options: Time, Time/Signal, Date/Time, and Date/Time/Signal. To see only the date and time without network status, choose Date/Time.
To move the top clock, long-press it and then drag. This keeps the clock from moving when you pull down the status bar. The clock can only be moved within the top half of the screen.
The clock position is saved separately for each preset. When you switch presets, the clock glides to the spot you set for that preset. If you never moved it, it sits at the top center of the screen. Dragging the divider or swapping panel positions leaves the clock where it is.
The expand button shown while the sidebar is collapsed can also be moved along the screen edge the same way (long-press, then drag).
Using GPS#
The GPS switch in Settings → Widget turns GPS use on or off at once for location-based features such as the weather widget. When it is off, you need to pick the weather region yourself.
Sidebar CPU status#
You can show the device's CPU status on the sidebar. This lets you check the device right away when the cabin heats up in summer. The setting is not in the Sidebar category but in the Top clock card in Settings → System.
- Under CPU display mode, choose one of Off / CPU temp / CPU usage / Temp + usage.
- When temperature is shown, choose °C or °F under Temperature unit.
Sidebar network status widget#
Shows signal strength, 5G/LTE, and Wi-Fi status together at the top of the sidebar. Turn it on or off with Network status in Settings → Sidebar.
Floating ball#
While you use another app in full screen, the floating ball at the screen edge gives you quick access to launcher functions.
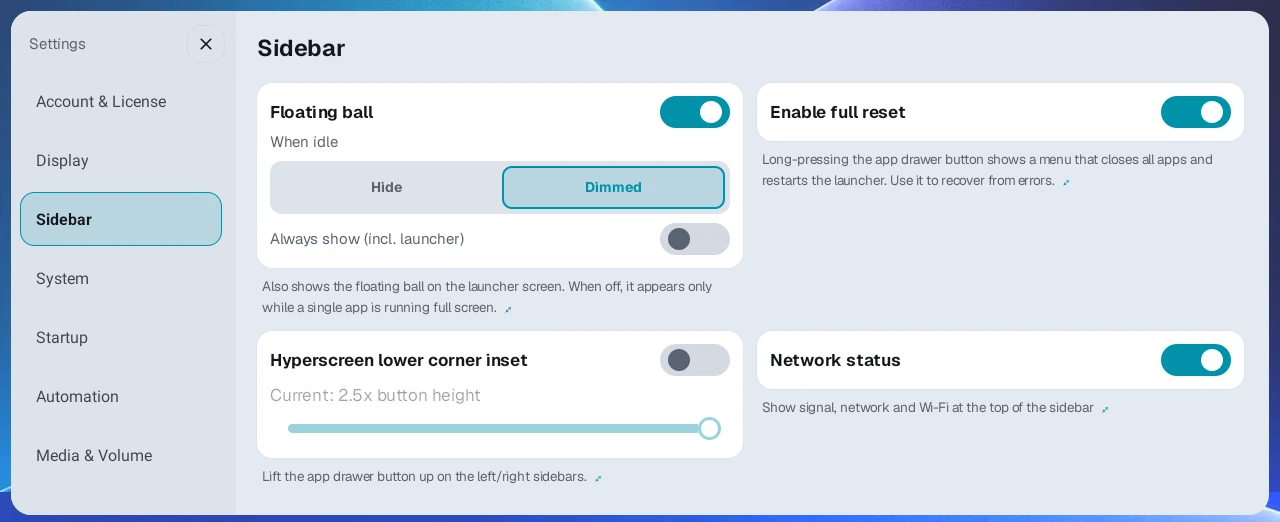
- Turn it on or off with the Floating ball switch in Settings → Sidebar. It is on by default.
- It appears while another app is running in full screen, with Back, Home (return to the launcher), Recent apps, App drawer, and Settings buttons. To show it on the launcher screen as well, turn on the Always show (incl. launcher) switch in the same card (off by default).
- With When idle set to Hide (default), the ball disappears after a short time without input and reappears when you touch the screen. This works only on supported devices. On other devices, a translucent ball stays in place. To keep it visible and translucent at all times, choose Dimmed.
- Press the ball to expand the button bar. It collapses again after 5 seconds without input. Press the handle (three dots) at the end of the button bar (on the ball side) to collapse it right away. Drag the ball or the handle to move it anywhere, and the position is kept for next time.
- Press the pin (keep expanded) button on the button bar to keep the bar expanded so it does not collapse on its own. Press the pin button again to release it. The pinned state is kept even after the launcher restarts.
- Press the Recent apps button to show running apps as cards, where you can switch apps or close them one by one or all at once.
- Anyone can use it, regardless of license.
In the same Settings → Sidebar screen, you can also turn Enable full reset and Network status on or off.
Theme and background color#
- Choose between the Default theme and the CarPlay theme.
- Choose from 7 backgrounds: Black, Gray, Gradient, Light, Sunset, Aqua, and Rose. The former Green background has been replaced by a rose image, so users who chose Green will see a different background after updating.
- Press the + button (Add background image) to the right of the background color list to pick a photo, move or zoom it to fit the screen, crop it, and use it as the background image. The added image appears at the end of the background color list and is not removed when you choose another background color, so you can select it again at any time. Only one image is stored, and adding a new one replaces the previous one. Long-press the image to delete it. The image is stored only on this device.
Border highlight, frosted background, and CarPlay shape#
Turn on Border highlight in Settings → Display to emphasize widget, split-panel, and sidebar borders. New installations have it on. Existing installations with no saved choice have it off. A choice made in a preview is kept after updating. Preset icons in the sidebar and the quick launch and automation icons in widgets also get a border.
Turn on Frosted background on the same screen to show a blurred view of the background image behind the sidebar, app drawer, Settings, and empty panels. It applies only when you use the Sunset, Aqua, or Rose background or a background image you added. New installations have it on. After an update it is off, so turn it on if you like it.
CarPlay shape applies only to the CarPlay theme.
- Corner roundness: Adjust from 0 to 32dp.
- Panel spacing: Adjust from 0 to 20dp.
- Float sidebar off the screen edge: Insets the sidebar by the panel spacing. Rounded corners must also be on for the sidebar.
New installations start with the Rose background, rounded CarPlay panels, and an inset sidebar. Updates keep existing settings. Default sets corner roundness to 16dp and panel spacing to 7dp, which differs from the new-installation look (27dp, 3dp). It doesn't change the sidebar floating switch.
Preset icon style#
Choose the shape of the preset icons on the sidebar.
- Simple: Clean rounded icons (default)
- Glass folder: Icons set on a translucent glass tile
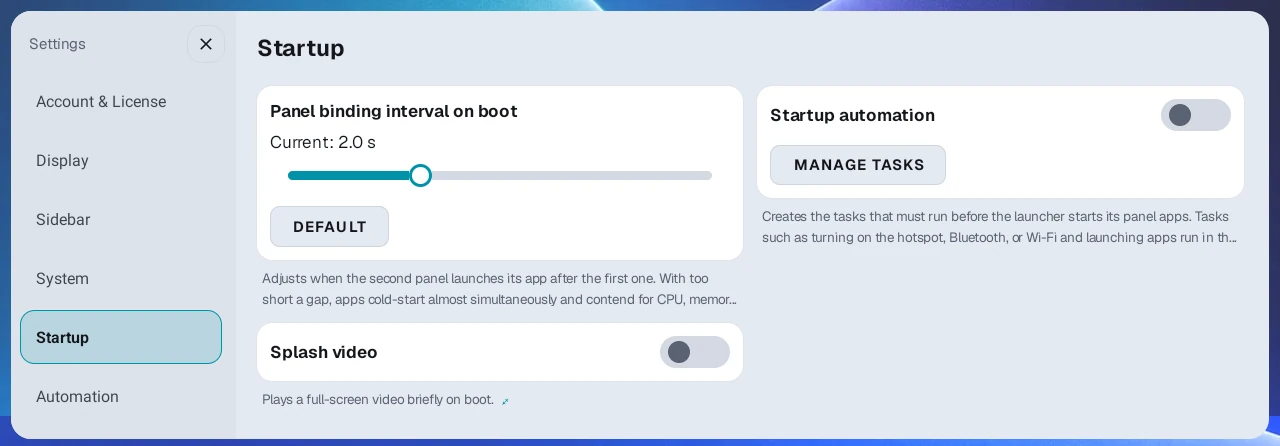
Splash video#
You can briefly play a full-screen video when the launcher starts.
- A default video is provided.
- Turn it on or off at the bottom of Settings → Startup.
Startup category#
Settings related to turning on the device or starting the launcher fresh are grouped in the Startup category of Settings. Startup screen, Launch apps after internet connects, App launch delay on boot, Panel binding interval on boot, Startup automation, and Splash video are all managed in this one category.
Launch apps after internet connects#
This option is on by default. When the launcher starts, it does not open panel apps right away. It first checks for an internet connection over Wi-Fi, LTE, or a similar network, then launches them, which reduces early network errors in navigation and music apps.
It waits up to 120 seconds for a connection. If there is still no connection after 60 seconds, the notice 'Waiting for an internet connection. Apps will launch in 60 seconds even if the connection is unavailable.' appears, and at 120 seconds the apps launch whether or not a connection is available. If you use the device without internet, turn this option off so you do not wait on every boot. Turning it off takes effect from the next launcher start. If the split screen has only widgets and no apps, or is empty, there is no wait.
While it waits, if you pick an app for a panel yourself, that panel launches right away and the other panels keep waiting for the connection. With a Pro license or the Beta trial and the automation helper app installed, you can also tap the top clock during this time to turn on Wi-Fi and the hotspot from the manual run window.
App launch delay on boot#
Right after boot, many apps and services start at once and memory runs short, so an app placed in the split screen can close the moment it launches and the screen may look frozen.
Under App launch delay on boot in Settings → Startup, you can delay when apps start launching, from 1 to 40 seconds (in 0.5-second steps). The default is 2 seconds. On devices with this symptom, delaying by about 20 to 30 seconds lets apps launch after the device has settled, which reduces freezes. It applies from the next boot.
Panel binding interval on boot#
If App launch delay on boot sets "when to start," Panel binding interval on boot sets "how far apart to launch the app in each panel, one after another."
Adjust it from 0.2 to 6 seconds in this setting under Settings → Startup (default 2 seconds, for a 2-way split). A shorter interval fills the screen faster, but the apps launch almost at once and compete for CPU, memory, and GPS. A longer interval spreads the load, but the screen takes a little longer to fill.
When all three panels of a 3-way split (both even and mixed) have apps, the interval is always fixed at 6 seconds regardless of this setting. Opening three apps at once puts much more load on memory and GPS, so this value is fixed on purpose to reduce instability right after boot. Even in a 3-way split, if a widget or empty panel means two or fewer apps launch, your interval setting applies as is.
Startup automation#
You can make a list of tasks to run automatically every time the launcher starts. User automation in Chapter 10 records actions inside a specific app's screen. Startup automation, by contrast, sets tasks to run in order for the whole device right after boot, regardless of app screens.
- Turn on Startup automation in Settings → Startup.
- Press Manage tasks and add the tasks you want, in order, from Turn on hotspot, Turn on Bluetooth, Turn on WiFi, Open app, and Activate accessibility service.
- Set a Wait before running time (seconds) for each task. For Open app tasks, set Time to keep app visible after launch instead, which is how long to wait after opening the app before moving on to the next task. Drag tasks in the list to reorder them.
- For tasks that need the internet (such as opening a streaming app), turn on that task's Run after internet connects switch in the list. The task runs after an internet connection is confirmed, and the list shows it like "5 sec · after internet connects".
Tasks with Run after internet connects turned on wait up to 60 seconds for the internet. If there is still no connection by then, only that task is skipped, a notice appears on screen, and the next task runs. You cannot turn this option on for Turn on WiFi and Turn on hotspot tasks, because those tasks are what create the internet connection.
Each time the launcher boots, the split screen starts to appear only after all registered tasks have run, in order. Tasks that take time, such as Open app, or tasks that wait for the internet make boot take that much longer, so add only the tasks you really need. If you leave the list empty, boot is not delayed.
Status bar#
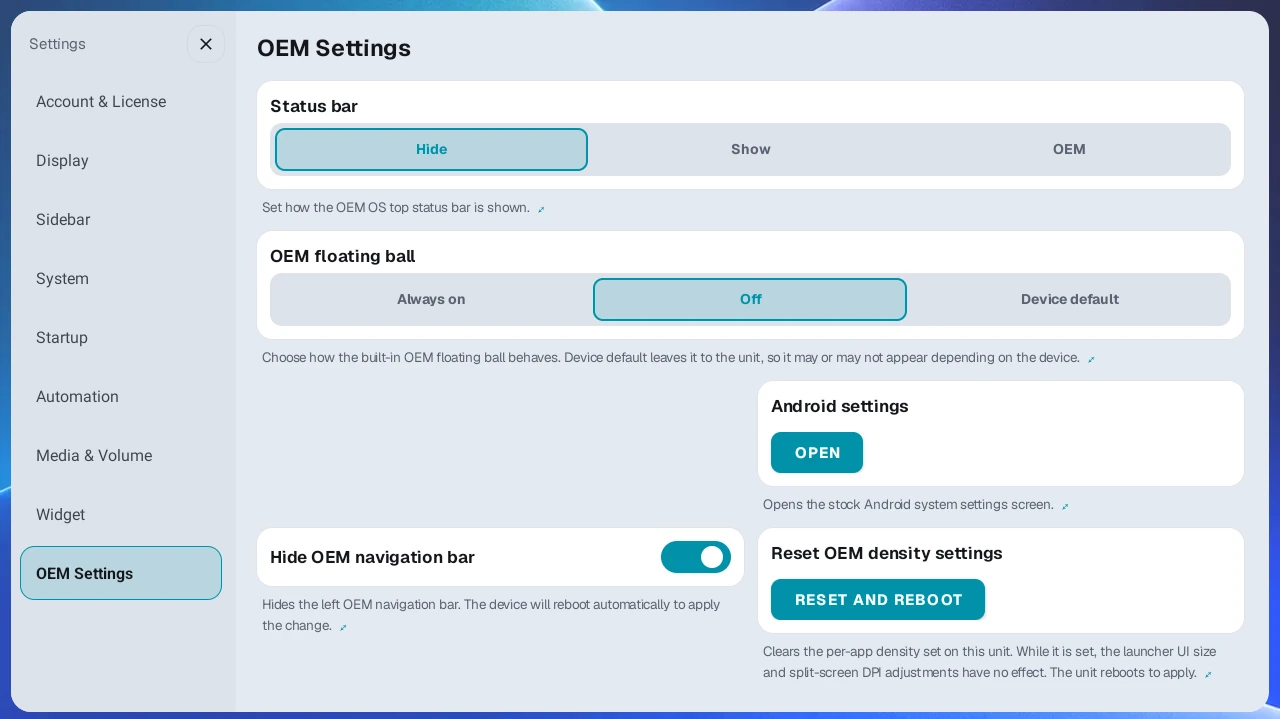
Choose how to handle the status bar at the top of the screen (GPS, Wi-Fi, clock, and so on) from three options under Status bar in Settings → OEM Settings. The default is Hide.
- Hide: Hides the status bar completely to use more of the screen.
- Show: Always shows the status bar.
- OEM: Uses the device's default status bar as is.
Default home app#
If AB Launcher isn't your default home (launcher) app, a notice appears. Press Open Settings in the notice or open Default home app in Settings → System to choose AB Launcher as the default. On standard devices, choose it in the system's home app picker. On some supported FYT devices, this button saves both the standard home and manufacturer home assignments. Press Later or close the notice to hide it for 24 hours.
Preset switching#
Choose what happens to apps that were running in the previous preset when you switch presets.
- Pause (default): Keeps apps running in the background so they restore instantly when you return to that preset.
- Force stop: Closes apps completely to free memory.
On devices where app screens glitch or stop responding, Force stop is recommended.
Ultra3 round display widget (supported devices only)#
On devices with a round auxiliary display, such as the Carlinkit Ultra3 series, an Ultra3 category appears in Settings. Turn the round display widget on or off with the Ultra3 widget switch in this category. If the display is mounted upside down, turn on Rotate 180° in the same card. The rotation switch can be changed only while Ultra3 widget is on.
- Swipe left or right on the clock page of the round display to choose a digital, analog, or watch face style.
- For the weather region, choose Auto (GPS) or the region you want under Weather region in Settings → Widget.
- Album art and playback controls for the music that is playing are shown together.
- Swipe the round display to the shortcut page, where you can swipe left or right through presets to pick one and use the Home and Back buttons and the panel swap and cross buttons. The swap and cross buttons are dimmed on a single layout, and when another app is running in full screen they change to App drawer and Recent apps buttons.
On devices without a round auxiliary display, this category is not shown.
OEM Settings#
The OEM Settings category in Settings appears on all devices. Status bar and Android settings appear on all devices. The other items may appear only in part, depending on the device.
- Reset OEM density settings: Clears all per-app screen size (density) settings the device has applied. Check this item first if adjusting a preset's DPI does not change the app screen or Launcher UI size does not take effect. Resetting reboots the device.
- OEM floating ball: Choose Always on / Off / Device default for the device's default floating ball. Choosing Off turns off the device's floating ball right away and turns it off again every time the launcher starts. To keep it from coming back later, the launcher turns it off once more 60 seconds after starting.
- Hide OEM navigation bar: Turns the device's default navigation bar on the left side of the screen off and on. The device reboots to apply the change.
- Touch assist settings: Opens the device maker's settings screen for the OEM touch button (floating ball) shown on screen.
- Android settings: Opens the stock Android system settings screen, separate from the device maker's settings app.
- Status bar: Chooses how the status bar is shown. See the Status bar section above.
- Restore built-in launcher: Appears only when Turn off built-in launcher in Lab is turned on, and brings back the device's built-in launcher that was turned off.
If the device's built-in launcher comes back on every reboot, use Turn off built-in launcher in Settings → Lab to keep it from running in the background. This card appears only on some devices, and on some firmware the device may fail to boot or the screen may stop responding after you turn it on, so use it only if you can accept this risk. If something goes wrong, revert with Restore built-in launcher above.
Split Apps & Touch#
Configure rotation, output, touch, and panel gestures in Settings → Split Apps & Touch.
- Prevent app-driven rotation: Try this if apps rotate sideways when resizing a panel. Off by default. It may reduce rotation in some apps, but others may appear in a narrow mobile layout. Changing it reloads the launcher and may interrupt music.
- Apply touch response settings: Applies Optimized Output + Fast touch response together if touches often fail. Shown on supported devices.
- Long-press a panel to open its menu: Opens the launcher's panel menu after about 1 second. Turning it off passes long presses, such as selecting a place on a map, to the app. Long-press editing of widgets and empty panels remains available.
- Drag a panel to swap positions: Swaps panels when you hold a panel and drag across a divider. Turn it off to stop apps swapping while you interact across a divider.
- Use divider touch: When off, divider dragging, long presses, and double taps are disabled and touches pass to the app underneath. Ratio adjustment during preset editing remains available.
The three panel gesture switches are on by default. Turn off only gestures that interfere with your apps.
Split-screen output and touch methods#
Choose both on one card in Settings → Split Apps & Touch. The card appears on Android 11 and later; output method selection requires Android 12 and later.
Split-screen performance
- Direct Output (Recommended): The default; displays panel apps without copying the screen.
- Optimized Output: Copies the screen for display with reduced load.
- Mirror Output (Legacy): Copies the screen for display; the longest-proven method.
Panel touch method
- Stable injection (existing): The proven default method.
- Fast touch response: The OS delivers touches directly. If an app has incorrect coordinates or untappable confirmation dialogs, add it under Choose excluded apps to use stable injection for that app.
- Low-latency injection: Improves response while keeping stable injection.
Direct Output (Recommended) cannot use Fast touch response. Choose Optimized Output or Mirror Output (Legacy) to use it. On Android 12 and later, choose both methods and press Apply; the launcher restarts. On Android 11, choosing a touch method applies it immediately.
Steering wheel voice button#
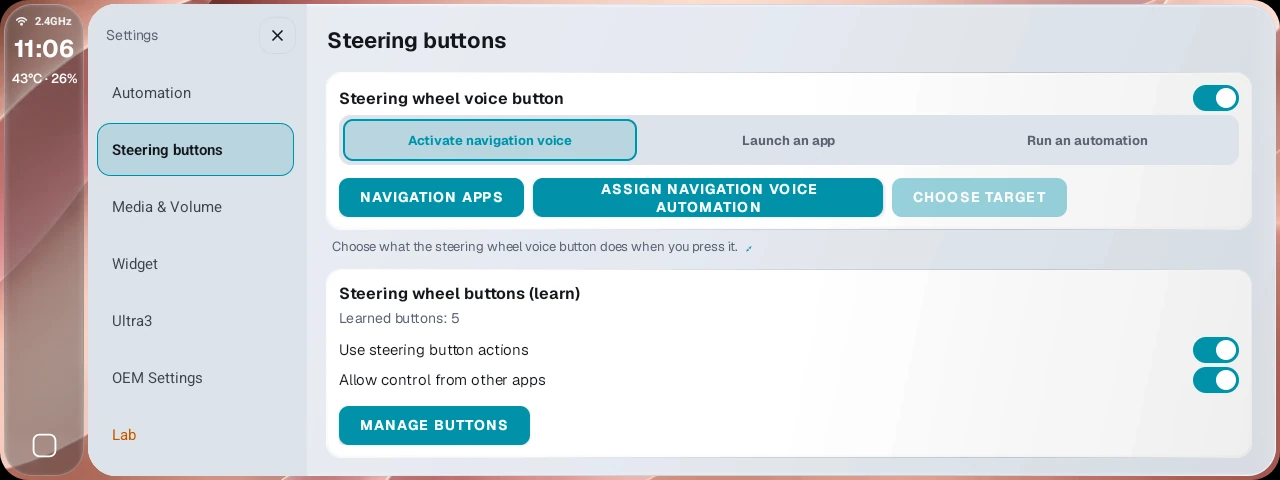
Set this in Settings → Steering buttons → Steering wheel voice button on supported devices. It is separate from button learning.
- First launch automatically connects the voice button and selects Activate navigation voice. Turn the switch on to connect, or off to restore the previous voice app.
- Choose Activate navigation voice / Launch an app / Run an automation.
- Navigation voice targets a visible navigation panel, prioritizing the one last touched. If unavailable, it shows a notice without trying another panel. Add/remove apps under Navigation apps → Apps to treat as navigation. Installed TMAP, KakaoNavi, and Naver Map are Fixed; Atlan is included but removable.
- TMAP, KakaoNavi, and Naver Map need no recorded automation; their license requirements are below.
- Other apps must be in Navigation apps. Record and save a press of their voice button as in chapter 10, then link it under Assign navigation voice automation. Only listed apps' automations appear, excluding the three above. Assign one per app; selecting it again unlinks it. On Android 10 devices, automations recorded with Standard don't appear in this list or in the automation list of Select target.
- For app or automation launching, specify Choose target.
Requirements for steering wheel navigation voice#
Launch an app works with every license. Among Korean navigation apps, TMAP also works with every license without automation setup. KakaoNavi and Naver Map require a Pro license or the Beta trial and the automation helper app, but no recorded automation.
Step 5's Assign navigation voice automation and Run an automation require a Pro license or the Beta trial and the automation helper app. A license notice appears if requirements aren't met.
Navigation voice targets a visible navigation panel. If that app cannot be activated, it doesn't activate an app in another panel.
Learning steering wheel buttons#
Learn buttons and assign actions in Settings → Steering buttons → Steering wheel buttons (learn). This is currently for AI Boxes only; all-in-one head units are not supported. Some cars may not pass button signals, long presses, or double presses even to an AI Box.
- Install or update the automation helper app and enable A·B Car Launcher Automation in Accessibility. If it isn't connected, check the status message first.
- Press Manage buttons → Learn a new button and press the button once.
- Follow the prompt to hold the same button for 1–2 seconds, name it, and save it. Holding too long may trigger the car's original function, such as a restart.
- Choose Short and Long actions on the saved button card. Unsupported press types cannot be assigned.
- Turn on Use steering button actions. It is off by default. Turning it off keeps assignments while returning buttons to normal behavior.
If a short press gives no signal, try a long press. If neither gives a signal, this button cannot be learned on this device. Learning and action assignment are unavailable in free basic mode. Run an automation requires a Pro license or the Beta trial and the automation helper app.
Double presses and steering button actions#
On a learned button card, choose + Double press, press the button twice quickly to check its signal, then select an action. No relearning is needed. If the button doesn't send a second signal, double press isn't available.
Assigning a double press delays a single press by about 0.3–0.6 seconds after release. Assigned actions replace the original function. Depending on the signal type, an unassigned single press may do nothing; check the screen's guidance.
Actions include play/pause, previous/next track, media app floating view, navigation voice, app and automation launching, preset navigation and focus selection, show/hide sidebar, and app panel swap/cross. Panel swapping needs at least two app panels and skips widgets and empty panels.
Open app in largest panel / return opens the chosen app in the largest visible non-widget panel. Press again to restore its original app. An app already in another panel or a background playback screen isn't opened twice. Use this while the launcher home screen is visible.
Allowing control from other apps#
Turn on Allow control from other apps in Settings → Steering buttons to let apps such as Tasker request navigation voice activation and run saved user automations. Off by default, and it can't be turned on in free basic mode; each action's requirements still apply. Existing split preset switching requests work regardless of this switch.
Lab features#
Settings → Lab collects features that haven't been verified on every device. Each time you open Settings, a Lab features warning appears the first time you enter Lab. Don't change values you don't understand; restore them if problems occur. Output and touch settings are now in Split Apps & Touch, voice button and learning settings in Steering buttons, and backups in Account & License.
Split-screen compatibility mode#
A Lab feature for Android 10 only that uses an alternative display method if split screen flickers. Changing the switch opens a confirmation dialog and restarts the launcher after confirmation. Panel apps may relaunch when changing layouts with this on. Turn it off if touch doesn't work properly.
Preview builds#
On some devices, open Settings → Lab → Preview builds → Open list to see installable versions. You cannot install a version with a lower versionCode over your current version. Switching to a release build is also possible only if it is installable. The launcher restarts automatically after installation.
Back up and restore settings#
Move or save your settings in Settings → Account & License → Back up and restore settings.
- Export: Saves launcher settings and diagnostic information in an encrypted backup file in the device's
Download/ab_backupfolder. - Restore: Choose a backup file. Current settings are automatically backed up again before restoration; imported settings take effect on the next boot.
- Licenses and OEM settings such as the status bar, floating ball, and default launcher vary by device and aren't restored. If the new device has a different screen, readjust Launcher UI size.
Backups include the license serial number. Send them privately to the operator for support, rather than posting them publicly.
Full reset#
When Enable full reset in Settings → Sidebar is on (on by default), long-pressing the app drawer button opens a menu. Choose Full reset in the menu to open a dialog asking whether to close all running apps and restart the launcher. If you turn this switch off, long-pressing does not open the menu, so you also cannot open Pick a layout template this way.
Check for updates#
Under Check for updates in Settings → Account & License, you can check the server for a newer version. If a new version is available, an update dialog appears, and you can see what changed with Release notes in the dialog.
User manual#
In Settings → Manual, you can look up how to use the launcher right on the device.
- Open manual: Opens the full manual in the device browser.
- Release notes: Shows the latest update details in the device browser right away.
- QR code: Scan it with your phone camera to read the manual on your phone.
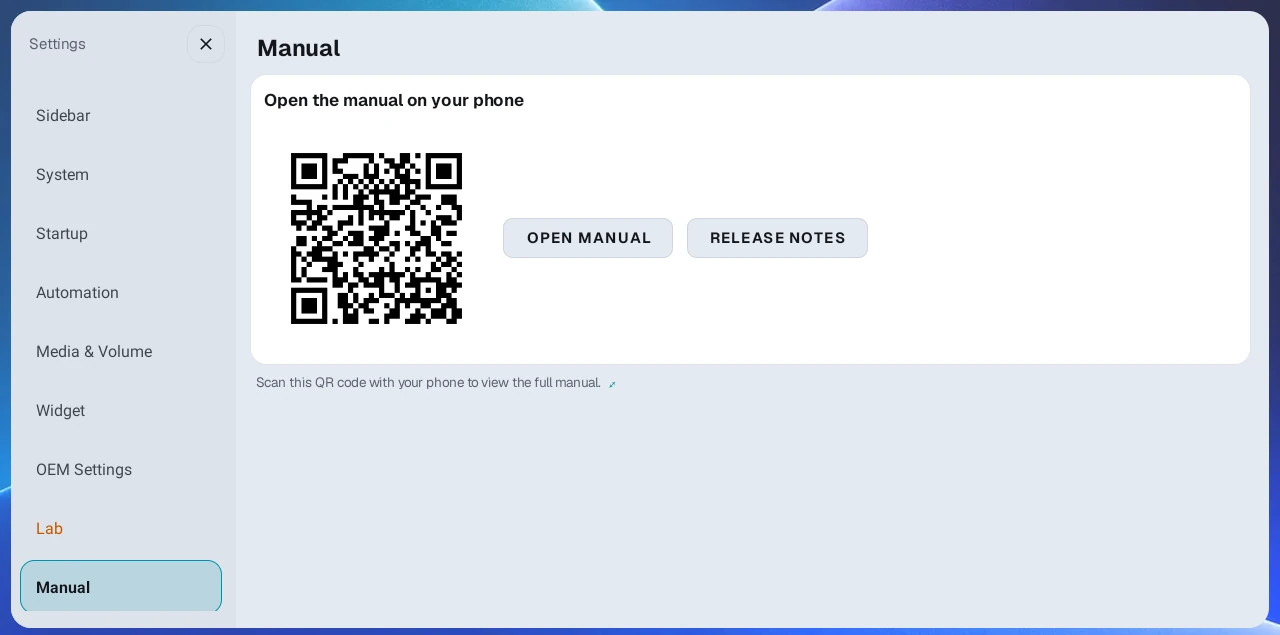
On a small device screen, use the QR code to read it on your phone. On a large screen, use Open manual. Do not read the manual while driving; stop first, then check it. The manual is shown in the language the device is using.
9. Audio and volume adjustment#
Audio enhancement (Start launcher at max volume)#
Turn on Start launcher at max volume under Settings → Media & Volume → Audio enhancement, and the launcher raises the media volume to the device maximum not only when it starts after ignition but also every time you return to the launcher screen with the Home button or similar (it also goes to maximum the moment you turn it on). Use it when your phone or Carlinkit volume starts low. If you prefer to keep the volume lower yourself, turn it off, because the volume goes back to maximum every time you return home. It may not work on some devices.
If the sound still feels quiet at maximum volume, tune the bass and treble with the equalizer below or use AB SoundFX.
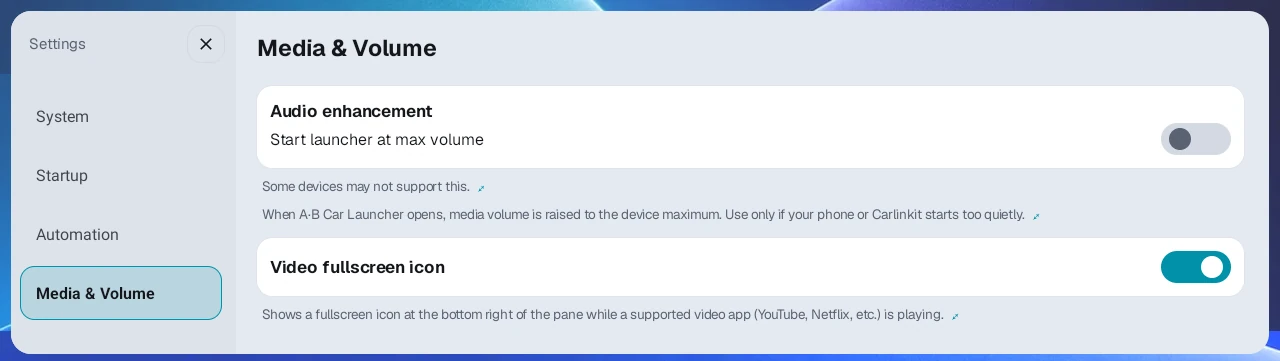
Equalizer#
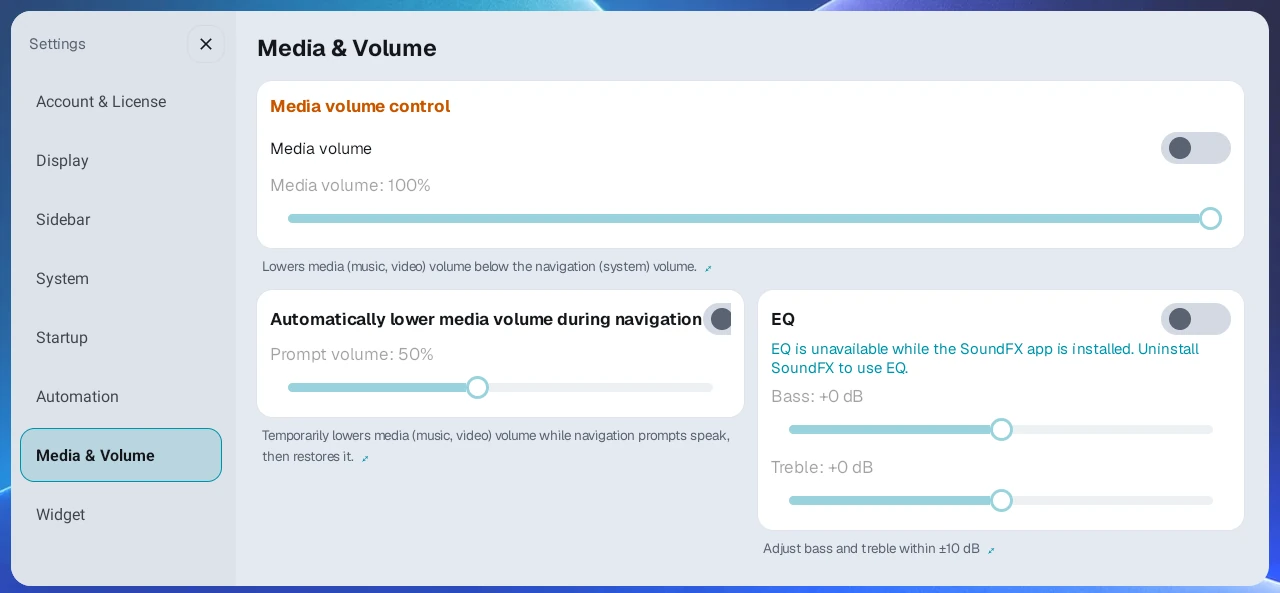
Turn on the switch in the EQ card under Settings → Media & Volume to adjust the bass and treble sliders within ±10dB and tune the sound for your vehicle. It is off by default and works on devices running Android 9 or later.
- If bass is lacking, raise the bass.
- If treble is harsh, lower the treble.
- The effect can feel different depending on the device and app.
Media volume#
You can lower media sound such as music and video below the system volume (it cannot raise it). Use it when you want to leave the volume buttons alone and just trim the media sound a little. Turn it on in the top card of Settings → Media & Volume and adjust it with the slider.
※ This is an experimental feature that may be unstable, so behavior may differ on some devices. It appears only with a Pro license or the Beta trial.
Automatically lower media volume during navigation#
Turn on Automatically lower media volume during navigation in Settings → Media & Volume. While a navigation voice prompt plays, only the music and video volume drops briefly, then returns to its original level when the prompt ends. The prompt itself is untouched, so directions stay clear.
- The slider below (Prompt volume) sets how much of the music volume to keep while a prompt plays (10 to 100%, default 50%). Lower values reduce it more, and 100% leaves it unchanged. Turn on the switch to adjust the slider.
- It automatically detects navigation apps in general that play standard guidance prompts, such as TMAP, KakaoNavi, and Naver Map. It is not limited to specific apps.
- Works with a Pro license or the Beta trial.
Keep navigation voice alive#
When you run navigation without playing music, this reduces the end of voice prompts getting cut off on some devices. It lives in a different category from automatic music lowering: turn on Keep navigation voice alive in Settings → Automation. This menu appears only with a Pro license or the Beta trial when the automation helper app is installed, and once you turn it on, it keeps working even if your license changes later.
Unlike automatic music lowering, it works from a fixed list of navigation apps and applies while TMAP, KakaoNavi, Naver Map, or Atlan is showing in a panel on the launcher screen. Add other navigation apps under Navigation apps in Settings → Steering buttons → Steering wheel voice button. If automatic music lowering is on, an app that has played a voice prompt once is also recognized the next time it opens in a panel.
AB SoundFX integration#
If you need professional sound tuning, you can install the AB SoundFX app right from the launcher.
- Press the Install AB SoundFX button at the bottom of the EQ card in Settings → Media & Volume. (It appears only with a Pro license or the Beta trial, and does not appear if SoundFX is already installed.)
- It downloads and installs automatically, and the button disappears when the install finishes.
- Once SoundFX is installed, the launcher's built-in EQ turns off automatically. The two can't apply the same sound effect at the same time. If you uninstall SoundFX, the launcher EQ turns back on.
- The launcher also checks for SoundFX updates.
10. User automation#
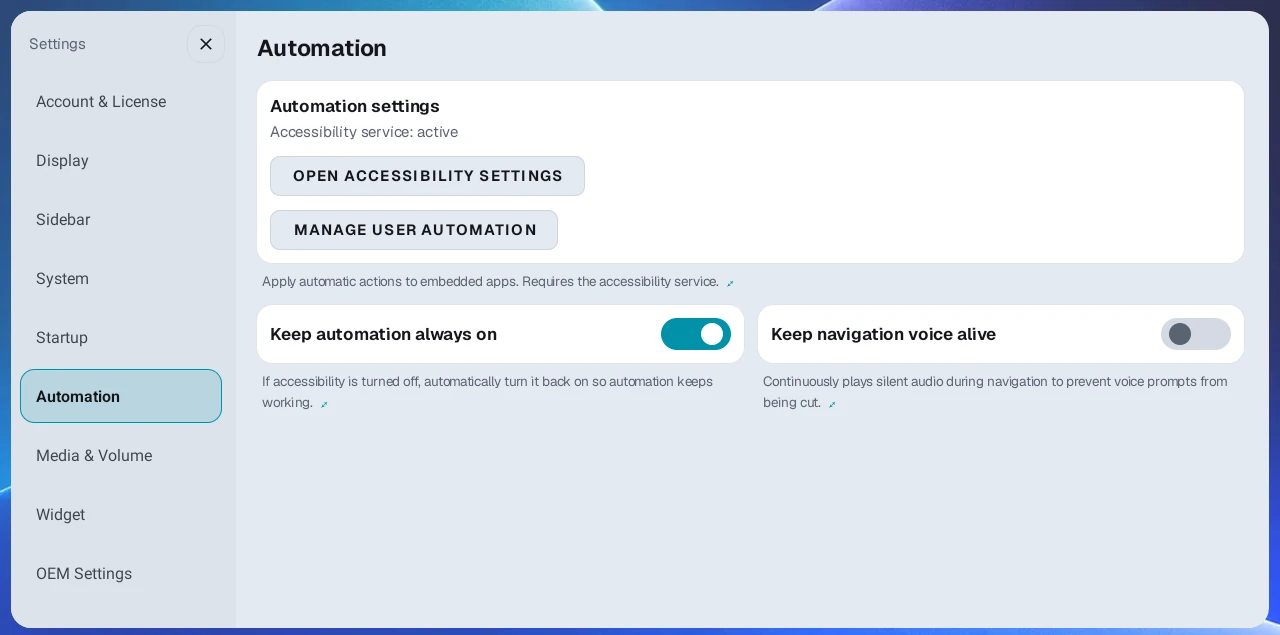
User automation records repeated on-screen actions and replays them automatically the next time that app runs.
Requirements#
You can use user automation when all of the following are met.
- A Pro license or the Beta trial
- Automation helper app (A·B Car Automation) installed
- Accessibility permission enabled
On a Basic license and in free basic mode (trial expired), user automation and shared automation presets are not available, and the Automation category does not appear in Settings. Basic still gives you all the core launcher features, such as split screens, presets, and display settings.
Android 10 all-in-one devices (such as the FYT 7862 series) can also use Coordinate automations and Shared automation presets registered on the server. Coordinates can vary by device and app, so check the result on the actual screen once after applying.
Installing the automation helper app and accessibility permission#
-
Go to the Automation category in Settings.
-
If a prompt to install the automation helper app appears, proceed with the install.
-
Press Open accessibility settings, then turn on the A·B Car Launcher Automation service on the accessibility settings screen.
-
Check that accessibility shows as active on the Automation screen.
※ Android may show a system warning when you grant accessibility permission, but AB Launcher uses this permission only for screen-action automation and does not collect personal information.
Keep automation always on#
On recent Android versions (especially Android 15), a reboot or system policy can turn off accessibility permission and stop automation. Keep automation always on is on by default. While it is on, the launcher detects when accessibility is disabled and turns it back on automatically so automation keeps running. (It appears only with a Pro license or the Beta trial when the automation helper app is installed.)
Recording an automation#
- Run the app you want to automate from a preset.
- Long-press that app's screen to open the menu, choose Record user automation, then pick an automation method.
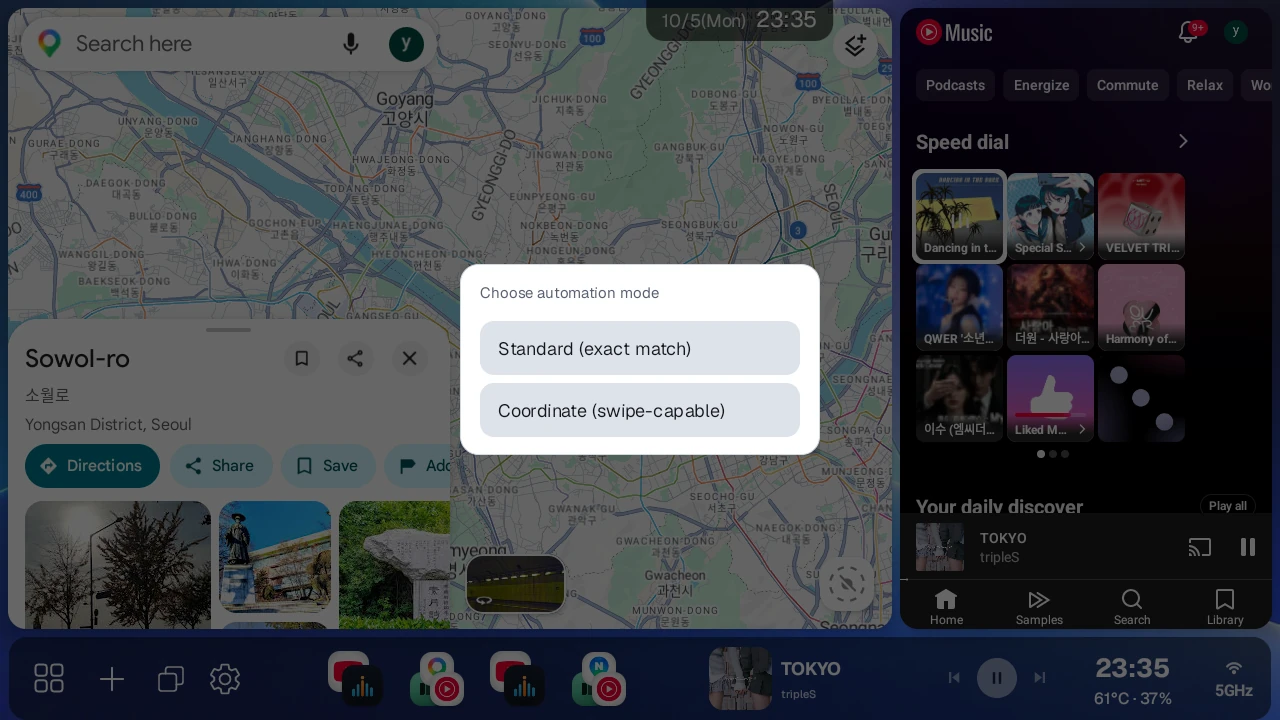
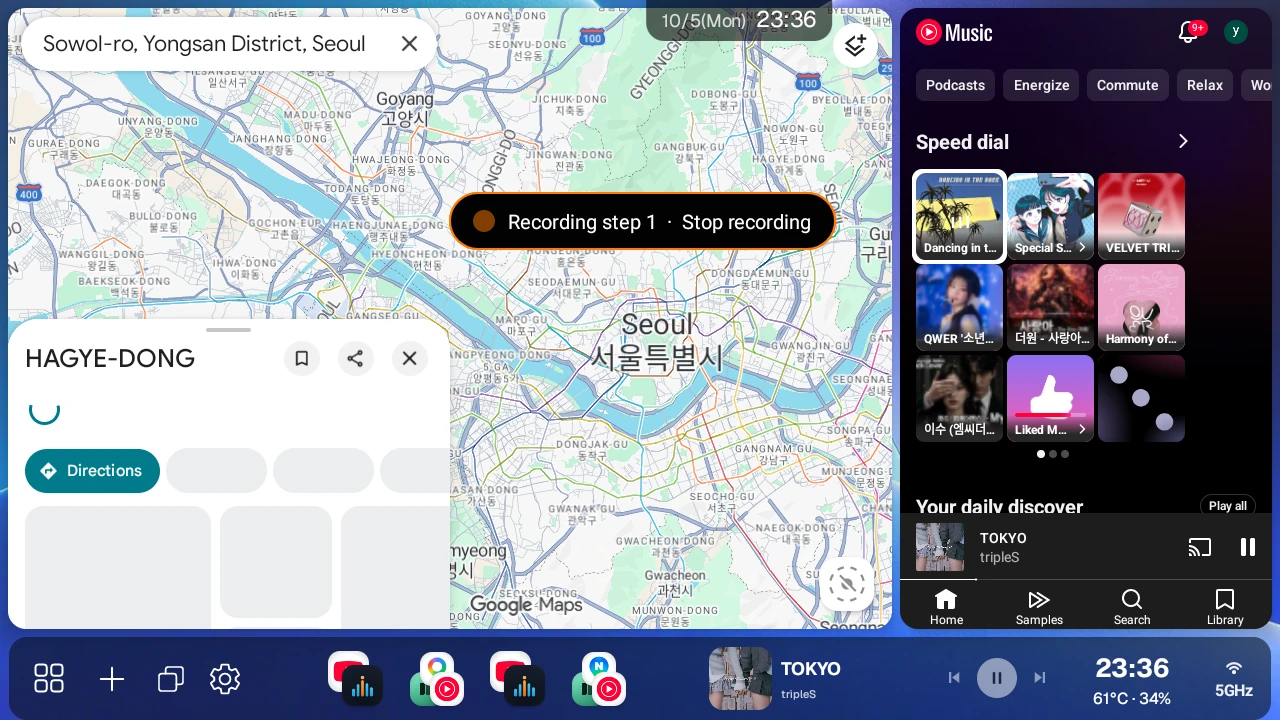
- When the recording indicator appears, press the start-recording button.
- Perform the actions you want to repeat, in order.
- Stop recording, then check the automation name and trigger delay on the save screen and save it.
- When you save, the automation is added to Manage user automation, and a dialog asks whether to turn on the automation you just recorded. Press Turn on and it runs starting the next time that app launches. If you press Later or close the dialog, it is saved turned off, so you need to turn it on yourself in Manage user automation. If the same app already has an automation turned on, turning on the new one automatically turns off the existing one.
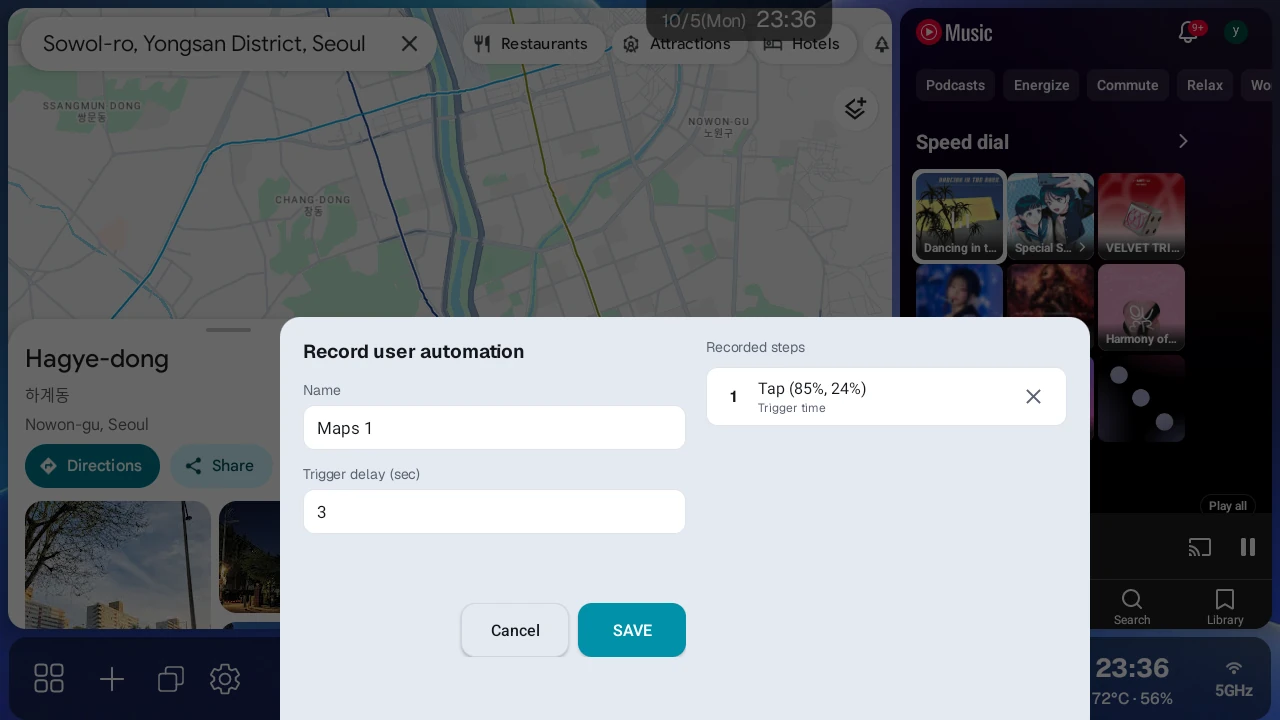
If an app already has 5 or more automations, counting shared presets you applied, you can't save a newly recorded one (for example, an app with 2 shared presets applied can take only 3 more recordings). You can apply shared presets until an app has 10 automations in total, including recorded ones, and you can record up to 10 steps in a single recording.
Choosing an automation method#
| Method | Description | Recommended when |
|---|---|---|
| Standard (exact match) | Finds and taps the target using the button's text, description, identifiers, and so on | Apps where button positions may shift slightly, general menus/buttons |
| Coordinate | Taps the recorded screen position exactly | Apps where the Standard method can't find the button, swipe gestures |
Start with the Standard method. If it has trouble finding buttons in a specific app, try the Coordinate method. On Android 10 and 11 devices, the method dialog shows only the Coordinate method, so record with that.
Notes for each method#
The Standard method finds and taps a screen element such as a button or menu. It keeps working as long as it can find the same element, even if the button moves slightly or the split ratio changes. Try this method first when you build your first automation.
The Coordinate method taps a specific position on the screen exactly. It's useful on screens the Standard method can't catch, but it depends on the screen size and layout at the time of recording.
- If the split layout, preset, screen ratio, resolution, or DPI changes, the coordinates can drift.
- If the screen orientation differs from the recording or the aspect ratio differs a lot, Review coordinates appears in the Manage user automation list and the manual run dialog. The automation still runs, but its taps may land in the wrong place, so check it once and re-record if it's off.
- To use it in a different screen layout, re-recording is safer.
- Record swipes by dragging slowly instead of flicking quickly. Fast flicks can replay differently because of the app's scroll inertia.
Tips for making good automations#
App screens are built differently, so an automation may not work perfectly on the first try. You may need to re-record a few times at first.
- For the same action, some apps work better with the Standard method and others are more stable with the Coordinate method.
- Some areas look like buttons but can't be tapped automatically. If you tap one while recording with the Standard method, the recording indicator briefly turns red and shows Not automatable, and that tap is neither passed to the app nor recorded. You don't need to stop recording. Try a nearby button instead, and if that doesn't work, re-record with the Coordinate method.
- After all 10 steps are recorded, the app no longer responds to taps and Max 10 steps appears. At that point, stop recording and save.
- Rather than recording many steps in one long take, test a few short steps first and then add the actions you need. It's more stable.
- If a step fails, re-record just that step using a different position or method.
- For automations that are tedious to build, try applying a verified shared preset from Shared presets first.
Turning automations on and off when an app launches#
- Open Settings → Automation → Manage user automation.
- Turn on the automation you want in the automation list.
- Only one automation can be on per app at a time.
- Turning on a new automation automatically turns off the app's other automations.
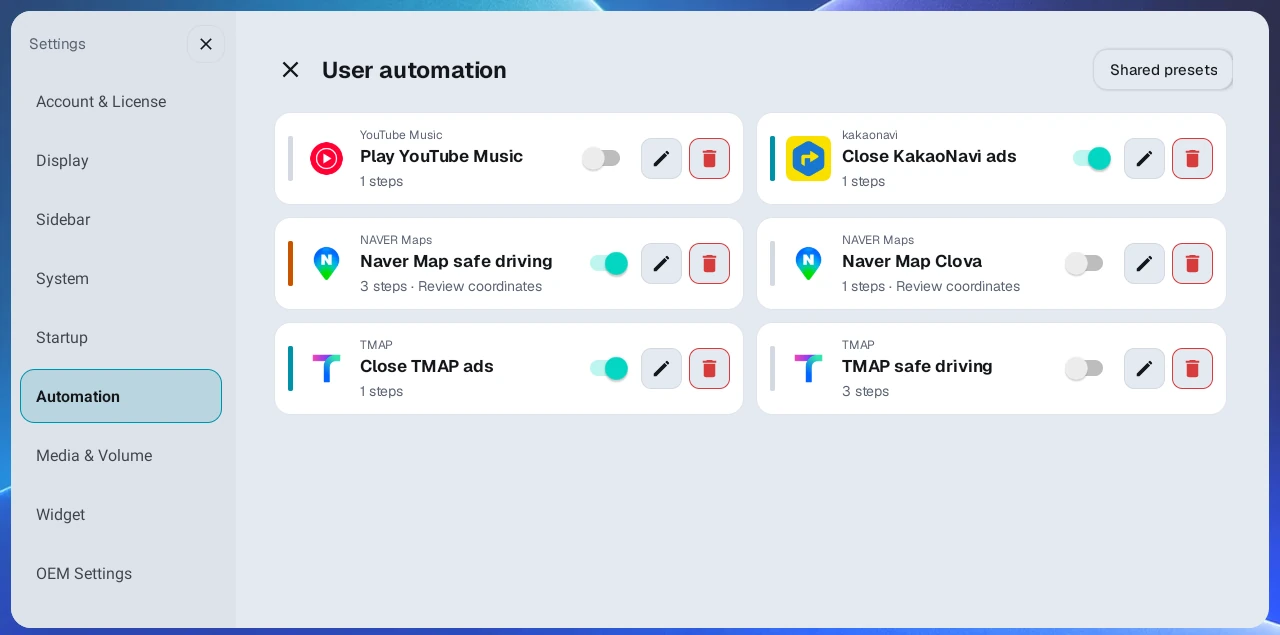
Manual run#
You can run an automation manually when needed, even if it is turned off.
- Tap the clock at the top.
- In the manual run dialog, choose the automation to run. The dialog lists only automations registered for the apps in the panels currently on screen. When the Runnable only switch at the top of the dialog is on (default), only automations that can run on the current screen are shown, so turn this switch off if the one you want isn't listed. If no panel on screen has an app (only widgets, or empty panels), the dialog has no automation list and you can only turn Wi-Fi and hotspot on and off.
- You can also turn Wi-Fi and hotspot on and off in this dialog. Right after boot, even before the panel apps appear (including while waiting for an internet connection), tapping the clock opens the dialog. In that case, instead of the automation list, it shows a notice that the list will appear when the split-screen apps are ready, and you can use Wi-Fi and hotspot right away.
On Android 10 and earlier devices, when you manually run a Standard automation, the launcher restarts that app and then runs the automation. Shared automation presets also use the Standard method, so they run the same way. The screen you were viewing goes back to the app's first screen, and any automation turned on for that app also runs. Coordinate automations run right away without restarting the app.
Shared automation presets#
In Settings → Automation → Manage user automation, press Shared presets at the top right to open a list of verified automations. Press Apply on the one you want to add it to your automation list. If the same app already has an automation turned on, the preset is added turned off, so turn it on in Manage user automation if you need it. Shared presets you already applied show Applied, and ones with a new version show Update available. Pressing Apply then updates only the content to the new version and keeps its on/off state.
Examples:
- Play YouTube Music
- Close KakaoNavi ads
- Close TMAP ads
- TMAP safe driving
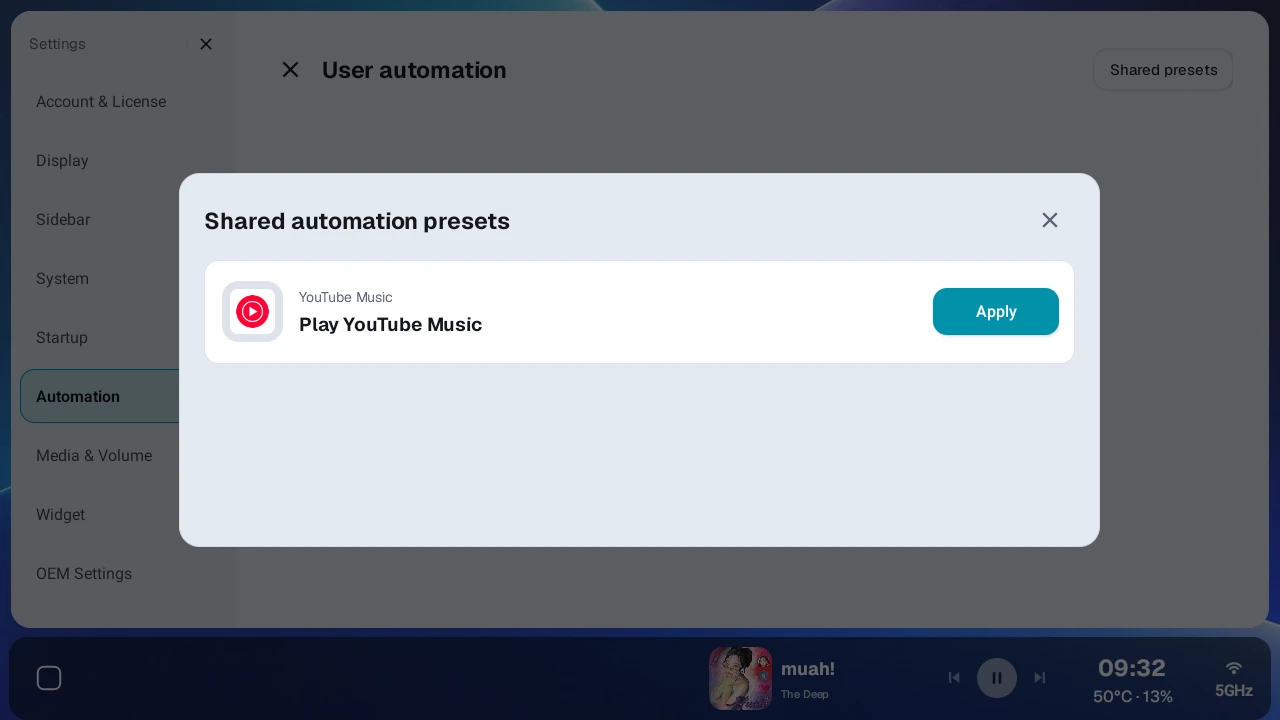
Shared presets can also behave differently depending on the actual app version or screen layout, so test once after applying.
11. License and account management#
AB Launcher supports account-based licenses and device registration.
Checking license status#
Check your current status in Settings → Account & License. The license card shows one of the following.
- Trial (all features available)
- Trial expired
- Licensed - Basic (automation not included)
- Licensed - Pro (all features)
The account card shows 'Purchased' for both Basic and Pro, so check the license card to see whether you have Basic or Pro.
When you first run AB Launcher, the device registers with the server and the Beta trial starts. The trial lasts 2 months, and during that time you can use every feature, the same as Pro. Make sure you're connected to the internet the first time you run it. If the device has never registered with the server, it shows as trial expired (free basic mode), and it tries to register again automatically once the internet connects. The Beta trial is given only once per device, so uninstalling and reinstalling the app does not restart it.
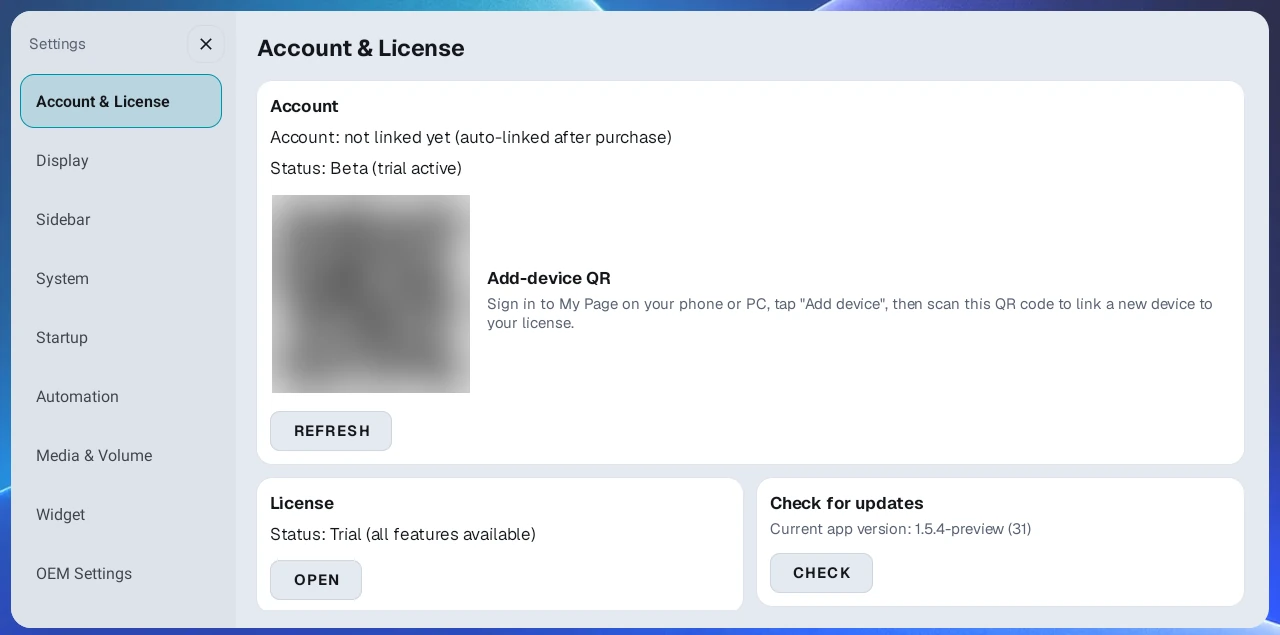
Press Open on the license card to see details such as the serial number, license type and expiration date, device ID, and linked account.
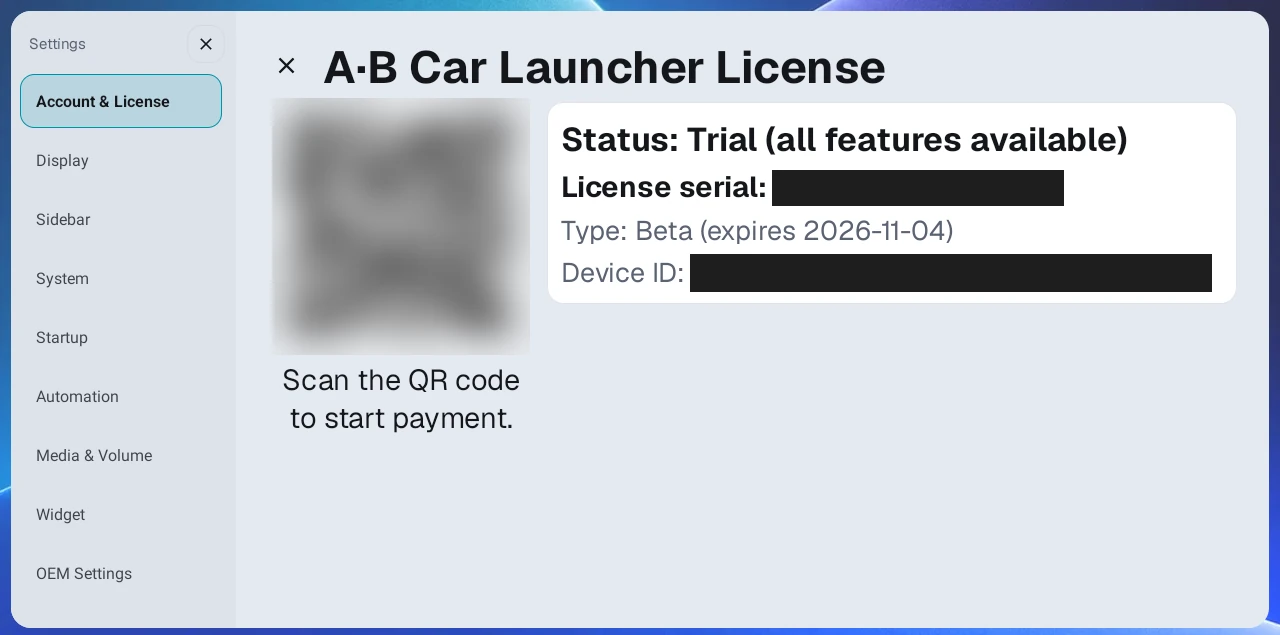
Basic vs Pro#
- Basic: Use the core launcher features. A Basic one-time purchase license is bound to the first device you register.
- Pro (monthly subscription or one-time purchase) or Beta trial: Use the core launcher features plus user automation. Both the monthly subscription and the one-time purchase Pro licenses are linked to your account, so you can register as many devices as your plan allows and keep using the same account when you change devices. The monthly subscription works for the subscription period, and the Pro one-time purchase works with no time limit. A Pro one-time purchase shows as Pro on the license card and as 'Perpetual' in the type field of the details screen.
Features available by license#
The table below summarizes the differences between free basic mode, Basic (one-time purchase), and Pro (monthly subscription or one-time purchase) or Beta trial.
| Feature | Free basic mode | Basic | Pro / Beta trial |
|---|---|---|---|
| App launch and basic launcher screen | ✓ | ✓ | ✓ |
| Building a split screen | △ | ✓ | ✓ |
| Running a saved preset | △ | ✓ | ✓ |
| Saving a new preset | ✕ | ✓ | ✓ |
| Single-app launch preset | ✕ | ✓ | ✓ |
| Adjusting the split ratio directly | ✕ | ✓ | ✓ |
| Per-preset DPI editing | ✕ | ✓ | ✓ |
| Recording / managing / running user automation | ✕ | ✕ | ✓ |
| Viewing / applying shared automation presets | ✕ | ✕ | ✓ |
| Installing the automation helper app | ✕ | ✕ | ✓ |
| Media volume | ✕ | ✕ | ✓ |
| KakaoNavi and Naver Map voice commands and running automations with the steering wheel voice button | ✕ | ✕ | ✓ |
| Automatically lower media volume during navigation | ✕ | ✕ | ✓ |
| In-launcher AB SoundFX install | ✕ | ✕ | ✓ |
| Swapping panel positions (swap, cross) | ✕ | ✓ | ✓ |
| Changing display and sidebar settings (see the list below the table) | ✕ | ✓ | ✓ |
Legend: ✓ Available · △ Partial / conditional · ✕ Not available
In free basic mode (trial expired), you can still build a split screen, but the ratio and display settings are limited to basic mode, and only 1 saved preset can run: the first one in the sidebar preset list (the top one on a left or right sidebar, the leftmost one on a bottom sidebar). Other presets are dimmed, and tapping one shows a notice that it's a paid feature.
TMAP voice commands and app launching with the steering wheel voice button work on every license.
In free basic mode (trial expired), your saved settings are not deleted, but basic mode takes priority on the actual screen.
- You can't change the split ratio by dragging the divider, and left/right two-panel split screens are shown at a 7:3 ratio.
- The theme is fixed to CarPlay.
- The Light background is shown as Navy. If you use your own background image, that image is still shown.
- The top clock area changes to the trial-expired indicator color.
- The sidebar does not start collapsed; it is shown expanded.
- The status bar is fixed to hidden regardless of your setting, and the splash video does not play.
- You can't swap panel positions (swap, cross). Long-pressing or double-tapping the divider, or dragging a panel to swap it, only shows 'Your trial has expired. Purchase to continue using this feature.'
- In Settings, Launcher UI size, Sidebar size, Default split ratio, Divider width, Theme, Background, Launcher sidebar collapsed (including Sidebar reopen style, Sidebar expand style, Button size, and Auto-collapse delay on the same card), Sidebar position, Hyperscreen lower corner inset, Splash video, Driver seat position, and the Status bar item are dimmed and can't be changed.
Basic (one-time purchase) is different from free basic mode. Basic excludes only automation-related features such as user automation, shared automation presets, and Automatically lower media volume during navigation, plus Pro and Beta trial features such as Media volume and in-launcher AB SoundFX install. Core launcher features such as running presets, split screens, themes, backgrounds, DPI, and sidebar settings work normally.
Account linking#
You can link your license to the Google account or email account you paid with. Pro licenses (monthly subscription or one-time purchase) can be registered under the same account when you replace or add a device.
Add-device QR#
On a PC or phone, sign in to My Page and choose Add device, then scan the Add-device QR shown on the account card in Settings → Account & License of AB Launcher on the new device to register it to your license. Add device on My Page appears only when the number of registered devices is below your license's device limit, and the Add-device QR is not shown on a device that already has a paid license linked.
Unlinking a device license#
You unlink a device license on My Page, not in the launcher. Sign in to My Page on a PC or phone, then press Unlink next to the device you want to remove in the registered device list. The launcher on the unlinked device updates when it reboots or checks the license again on returning to the home screen. Pressing Refresh in Settings → Account & License also applies the change right away.
Things to note:
- The license stays on your account.
- You can register another device with the same license.
- Unlinking does not start a new trial. If this device still has time left on the Beta trial it first received, it returns to the Beta trial. If that period has passed, it goes to the trial expired state (free basic mode).
- A Basic one-time purchase license is bound to the first device you register.
Sending diagnostics#
If a problem occurs, send records and get a receipt number from Settings → Account & License → Send diagnostics.
- Reproduce the problem once if possible, then press Send on the Send diagnostics card.
- Read the transmission notice. Settings, recent error and restart records, and system logs that may include records from other apps are sent. The stated retention period is 30 days.
- Note the receipt number received after sending. Give it to the operator along with your device model, affected app, and steps to reproduce the problem.
- If sending fails, try again later or use Save as file and send it privately to the operator.
Server sync#
If you paid but the status doesn't change right away, or the device registration state doesn't match, run server sync with Refresh.
12. Troubleshooting common issues#
Panel apps load slowly right after boot#
Check Launch apps after internet connects in Settings → Startup. This option is on by default. While it's on, the launcher holds the panel apps and shows only a loading indicator for up to 120 seconds until an internet connection is confirmed, and a notice appears on screen after 60 seconds. After 120 seconds, it launches the apps whether or not it's connected. If apps load late every time you boot without internet (for example, with no hotspot connected), turn this option off. The change applies from the next time the launcher starts. Conversely, if you turned the option off and get network errors right after the apps load, turn it back on.
The screen freezes right after boot#
Try raising App launch delay on boot in Settings → Startup to about 20 to 30 seconds, depending on your device. This avoids the low-memory period early in boot so apps start reliably. The same fix also helps when a panel's app is closed by GPS or low memory and the panel is left empty. When a three-panel split screen holds 3 apps, the app launch interval is always fixed at 6 seconds regardless of the Panel binding interval on boot setting, so this issue shows up less.
The screen glitches or stops responding after switching presets#
Try changing Preset switching in Settings → Sidebar to Force stop. Fully closing the previous preset's apps can reduce screen glitches.
Panel touch is slow or affects other panels#
On Android 11 or later, try Settings → Split Apps & Touch → Panel touch method. With Direct Output (Recommended), try Low-latency injection first. To use Fast touch response, switch to Optimized Output or Mirror Output (Legacy) first. If an app has incorrect coordinates or untappable dialogs, add just that app with Choose excluded apps. If problems persist, return to Stable injection (existing). On Android 12 and later, press Apply after choosing.
Split screens flicker on Android 10#
On an Android 10 device, try turning on Split-screen compatibility mode in Settings → Lab. It switches split screens to an alternative display method to reduce flicker. When you change the switch, a confirmation dialog appears, and pressing OK restarts the launcher to apply it. After you turn it on, panel apps may restart when you change the screen layout. If touch doesn't work properly, turn it back off. This item appears only on Android 10 devices.
Text or buttons are too small#
First adjust Launcher UI size. If only a specific app looks small, adjust the per-preset DPI.
Preset DPI or UI size doesn't take effect#
Try Reset OEM density settings in Settings → OEM Settings. The device may have fixed the screen size of specific apps on its own. The device reboots after the reset.
The sidebar takes up too much of the screen#
First reduce Sidebar size in Settings → Sidebar. For more space, turn on Launcher sidebar collapsed and set Sidebar reopen style to Button or Swipe bar.
Memory is low or app switching is slow#
In Settings → Sidebar, turn on Recent apps button, then long-press the button for 1 second. It closes apps that aren't currently visible while keeping the screen you're viewing and the music that's playing. Closed apps start fresh the next time you open that preset.
The app drawer is too cluttered#
Hide apps you rarely use and move your most-used apps to the top.
Automation doesn't run#
Check the following in order.
- Check that you have a Pro license or the Beta trial.
- Check that the automation helper app is installed.
- Check that accessibility permission is on.
- Check that the automation for that app is turned on.
- Check that turning on another automation for the same app didn't turn off the existing one.
The end of navigation voice prompts gets cut off#
Turn on Keep navigation voice alive in Settings → Automation. It reduces prompts getting cut off when only navigation is running. This switch appears only when the automation helper app is installed, and the Automation category appears only with a Pro license or the Beta trial.
The device's built-in launcher keeps coming back after reboots#
Go to Settings → Lab, read the warning, then try turning on Turn off built-in launcher. It keeps the device's built-in launcher from running in the background. This item appears in Lab only on devices with a supported OEM built-in launcher installed. On some firmware, the device may fail to boot or the screen may stop responding, so use it only if you can accept that risk. If something goes wrong, undo it with Restore built-in launcher in Settings → OEM Settings.
The media app floating view won't open#
Check Media app floating view in Settings → Widget and Media player under Sidebar. An app already visible on screen won't open again in floating view. Android 12 and later are supported, as is Android 10 with compatibility mode on; Android 11 is not supported.
Music starts automatically after an update#
Check Play music on boot in Settings → Widget. The selected music app can now play automatically even in layouts without a media widget. Turn this switch off if you don't want that.
Panels are empty after repeated restarts#
If the system restarts repeatedly in a short period, the launcher may clear its automatic panel-app startup configuration to stop the restart loop. This also turns off Play music on boot. Assign apps to panels again and check your startup preset and Play music on boot. If it happens again, share your Send diagnostics receipt number and device model.
Checking whether you're on the latest version#
For release versions, use Check for updates in Settings → Account & License. On some devices, you can also install test versions from Settings → Lab → Preview builds.
13. Recommended initial setup example#
After your first install, the settings below give a comfortable start on most car screens.
| Item | Recommended value |
|---|---|
| Driver seat position | When the sidebar is at the bottom, the side of your actual driver's seat |
| Sidebar position | Left or right |
| Launcher sidebar collapsed | On if the screen is narrow |
| Launcher UI size | Start at Medium, then adjust |
| Sidebar size | Start at the default (100%); reduce it if only the sidebar is too large |
| Play music on boot | Turn on only if you want playback on boot, with or without a widget |
| Weather refresh interval | Default (5 minutes) |
| Per-preset DPI | Start at the default (calculated from screen resolution); adjust in preset editing if a specific app is too large or small |
| Startup screen | Last opened apps |
| Launch apps after internet connects | Keep the default (on); turn off if panel apps load late after booting without internet |
| App launch delay on boot | Start at the default (2 s); try 20–30 s if the screen freezes just after boot |
| Panel binding interval on boot | Start at the default (2 s); always 6 s when three panels all contain apps |
| Preset switching | Start at the default (Pause); use Force stop if apps stop responding |
| Split-screen performance (Android 12+) | Direct Output (Recommended); Mirror Output (Legacy) if unstable |
| Panel touch method (Android 11+) | With Direct Output, Stable injection or Low-latency injection. On Android 11 or other output modes, Fast touch response with problem apps excluded |
| Start launcher at max volume | Turn on only if your phone or Carlinkit volume starts low |
14. Getting help#
For questions or device-specific behavior, ask in the AB Launcher community on Naver Cafe or our Telegram channel. Including the information below helps us identify the problem faster.
- Your device model
- Screen resolution
- AB Launcher version (shown on Check for updates in Settings → Account & License)
- The affected app's name
- Photos or videos of the problem
- The receipt number from Send diagnostics in Settings → Account & License
- If needed, the backup from Back up and restore settings → Export in the same category (
Download/ab_backup). It contains your license serial number, so send it privately to the operator instead of posting it publicly.